As a Staff user in Staff View, you can now create a stored payment method for an account so constituents can use a stored eCheck account or credit/debit card when checking out. Creating a stored payment method creates an external payment profile record and a related profile in the payment gateway.
-
Nimble AMS Stored Payments permission set
-
In the tab bar, click on the App launcher icon, or in Salesforce Classic, click +, Search Nimble AMS, Staff View, Button, and All Tabs.
-
Search for Accounts and click on it.
-
Click on the account for which you wish to create a New Store Payment Method.
-
In the Related list, navigate to Stored Payment Methods and click on the "New Stored Payment Method" button.
If your association has more than one entity with payment gateways, in the Entity section, select the entity and payment gateway for which you want the stored payment method created.
-
If your association uses stored Credit Cards and Bank Accounts, in the Type section, select the type of stored payment method you wish to create.
-
When adding a Credit/Debit card, fill in the required details:
-
Information of the card holder that needs to be entered:
-
Name on the Card: Enter the name associated with the credit or debit card. -
Nickname (Optional): Enter a nickname for a credit or debit card. This field is optional.
Adding a nickname to a credit or debit card makes it easier to identify and organize multiple payment methods and helps in choosing the appropriate card.
-
Card Number: Enter the unique number on the front of the credit or debit card. -
Month: Enter the expiration month of the card. -
Year: Enter the expiration year of the card. -
CSC: Enter the Card Security Code. The CSC is a three or four-digit security code that is typically located on the back of the credit or debit card. It can also be called CVV (Card Verification Value) or CVC (Card Verification Code).
Billing Address
-
Street: Enter the street or house number -
City: Enter the city. -
State: Enter the state or region. -
Postal Code: Enter the postal or ZIP code. -
Select Country: Enter the country associated with the billing address. -
Set As default: To set the payment method as default, check the box. -
Click Save.

Once the payment method is successfully saved, an external payment profile is generated.
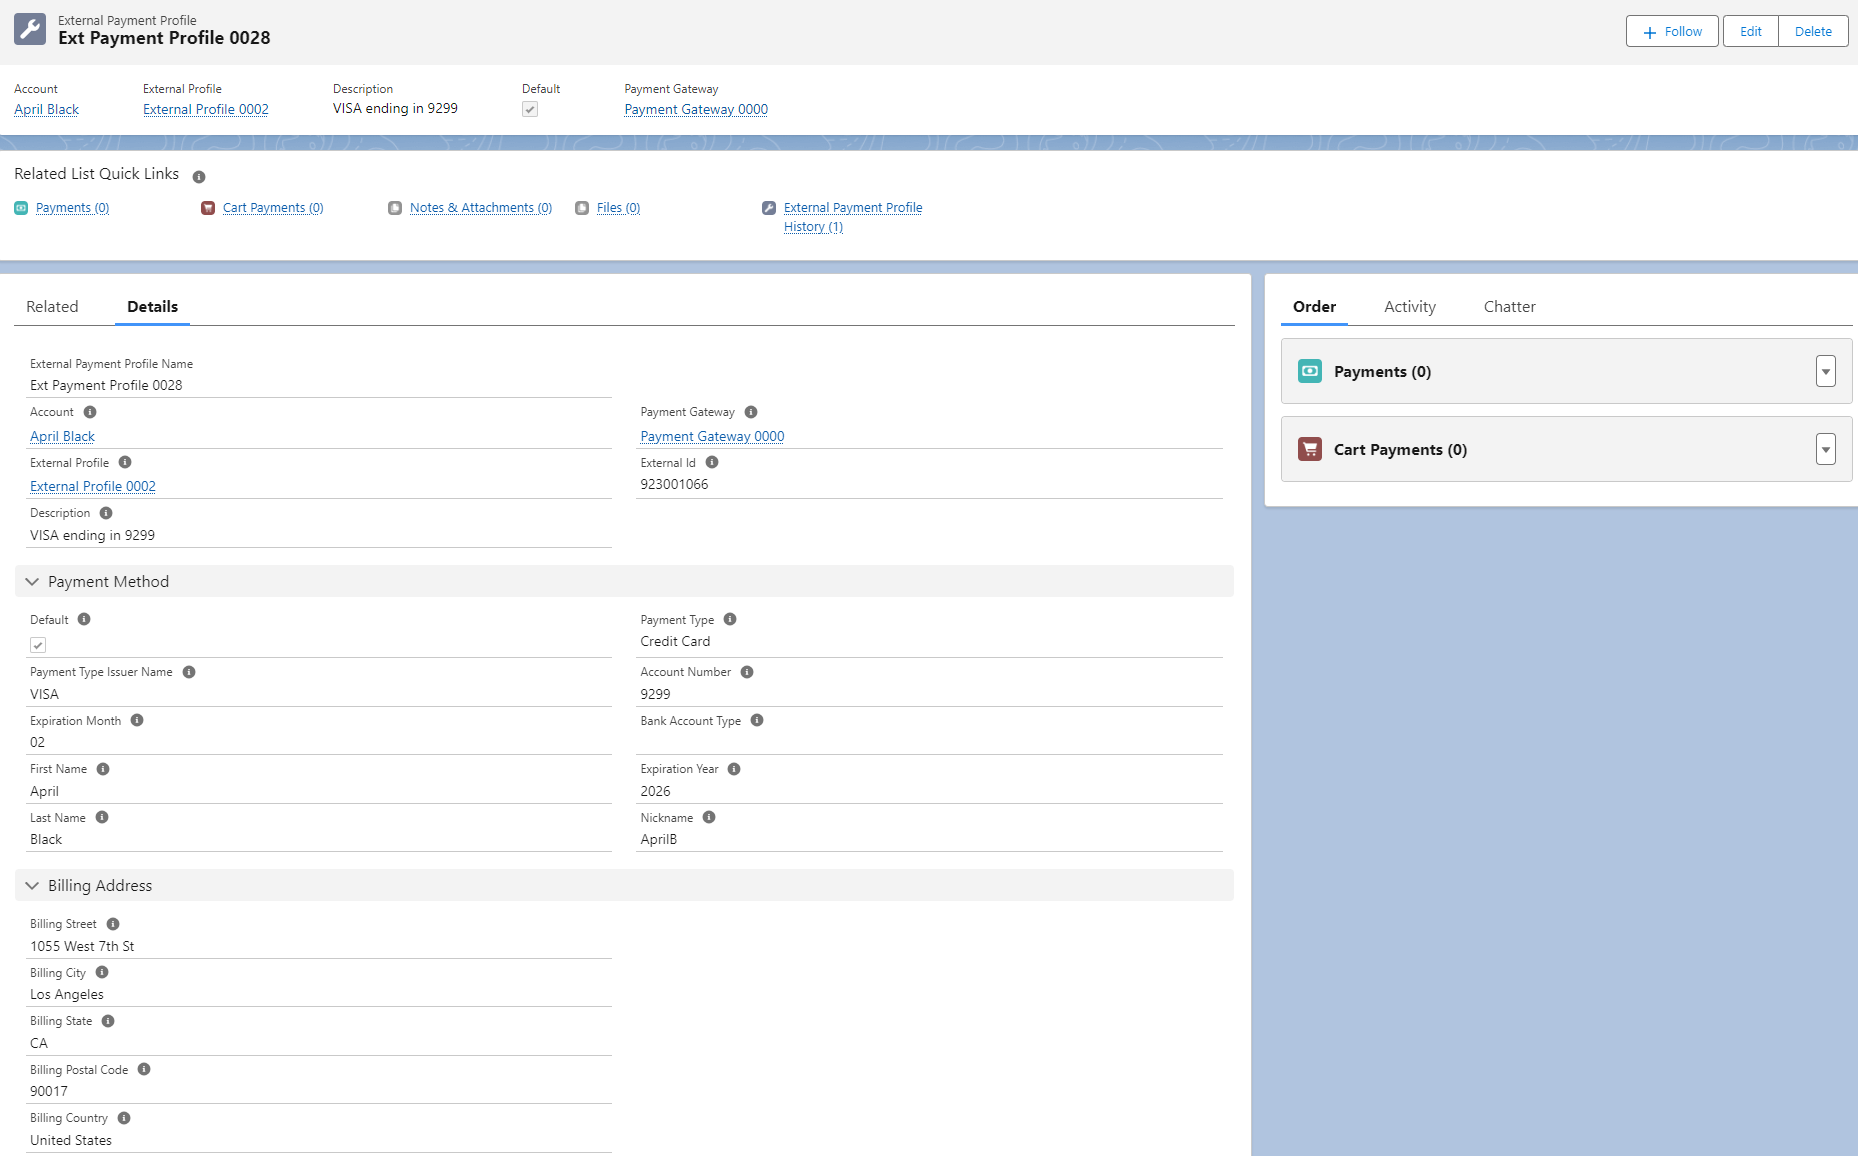
Figure 1. The screenshot shows the Ext Payment Profile generated for the Credit/Debit card type.
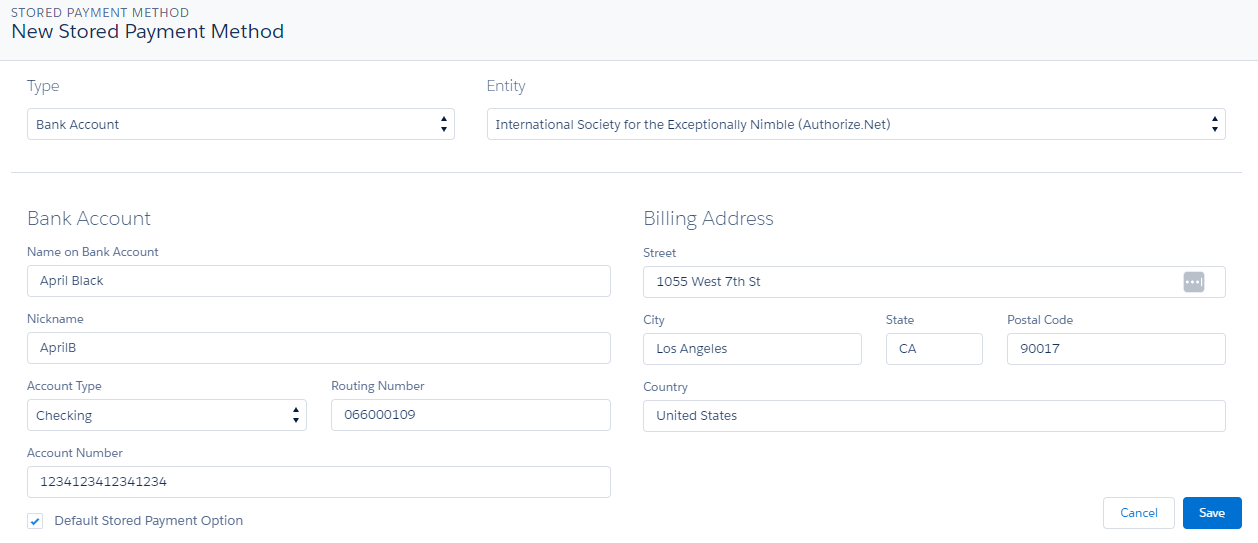
b. When adding a Bank Account, fill in the required details:
Information of the Bank Account holder that needs to be entered:
-
Name on the Bank Account: Enter the name associated with the bank account. -
Nickname (Optional): Enter a nickname for a credit or debit card. This field is optional.
Adding a nickname to a Credit/Debit card and Bank Account makes it easier to identify and organize multiple payment methods and helps in choosing the appropriate card.
-
Type of Bank Account: Staff users can choose from the dropdown list, which offers three options: -
-
Checking: Select this option if you are providing the bank account detail that is a personal checking account.
-
Savings: Select this option if you are providing the bank account detail that is a personal savings account.
-
Business Checking: Select this option if you are providing the bank account detail that is a business checking account.
-
-
Routing Number: Enter the routing number for the bank account. -
Account Number: Enter the Account Number associated with the member's bank account.
Billing Address
-
Street: Enter the street or house number -
City: Enter the city. -
State: Enter the state or region. -
Postal Code: Enter the postal or ZIP code. -
Select Country: Enter the country associated with the billing address. -
Set As default: To set the payment method as default, check the box.
Terms and Conditions
-
I Agree: Carefully read the terms and conditions and tick the checkbox “I Agree” before proceeding to save the bank account.
Once the payment method is successfully saved, an external payment profile is generated.
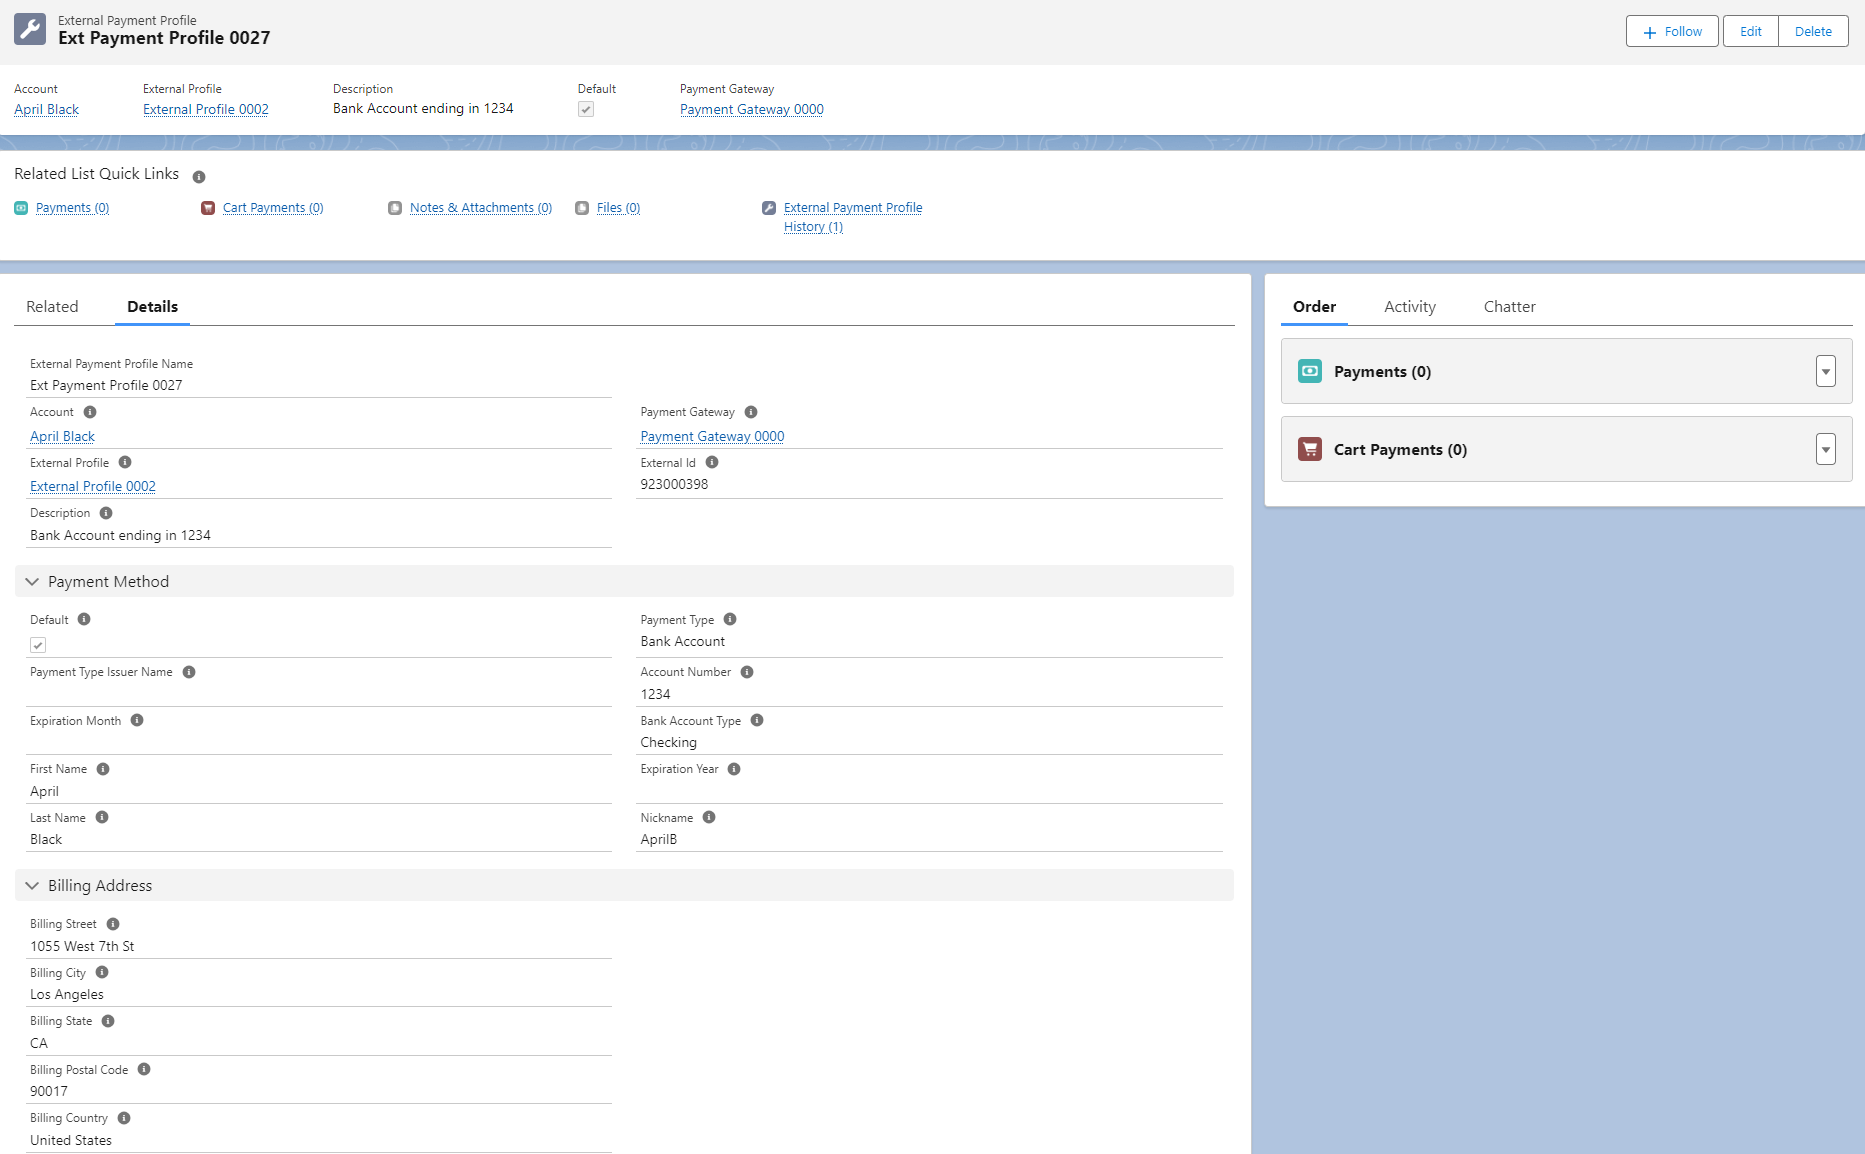
Figure 2. The screenshot shows the Ext Payment Profile generated for the Bank Account type.
When a Credit/Debit Card or Bank Account is stored as a payment method on the staff view (SV) side, it also gets added to the "My Payment" page on the member Community Hub side. Similarly, when a member adds a stored payment method on the CH side, an external payment profile is generated on the SV side, which represents the stored payment details.
The Visualforce Community Hub does not support the addition of a nickname.
Keep in Mind
-
eCheck stored payment methods require customer authorization prior to processing a payment.
-
The payment gateways require the first word entered in
Name on Credit CardorName on Bank Accountbe stored inFirst Nameand the rest be stored inLast Nameon the stored payment method. As an example, if the name on the stored payment method isApril C. Black,First Namewill have the valueAprilandLast Namewill have the valueC. Black. -
When a new stored payment method is created, a new payment profile is made in a payment gateway and a nominal charge to the account of less than $1 is made temporarily to ensure the payment option is valid and is voided soon after.
-
If your Administrator has enabled the Hosted Payment Forms, you will enter the eCheck account or credit/debit card details on the Hosted Payment Form and store them on the Hosted Payment Gateway instead of Nimble AMS or Community Hub. You can use the 'Hosted Page Experience' toggle to enable or disable the Hosted Payment Forms experience. Learn more.