The Schedule Payment Support for the Member Portal, built on Experience Cloud aims to simplify and enhance the management of member payments, making the process more convenient. On the Member Portal Checkout page, association members now have the flexibility to schedule their payments according to their preferences. This feature includes One-Time Scheduled Payments and Installment Payments.
By planning your payments, you can ensure timely order processing, avoid missed payments, and gain flexibility tailored to your financial needs. This guide will provide you with a step-by-step process for scheduling payments. Adhering to the correct procedures will ensure a smooth and efficient checkout experience.
View the Product Details and Make a Purchase with Buy Now
Association members can browse various products available through the association's online store. They can view additional product information by clicking on any of the products in the store. They see each product's image, name, description, and price. The product's list price is displayed to the guest user. A special price, when applicable, is displayed when a user logs into Member Portal. They will also be able to choose the quantity that they want to purchase.
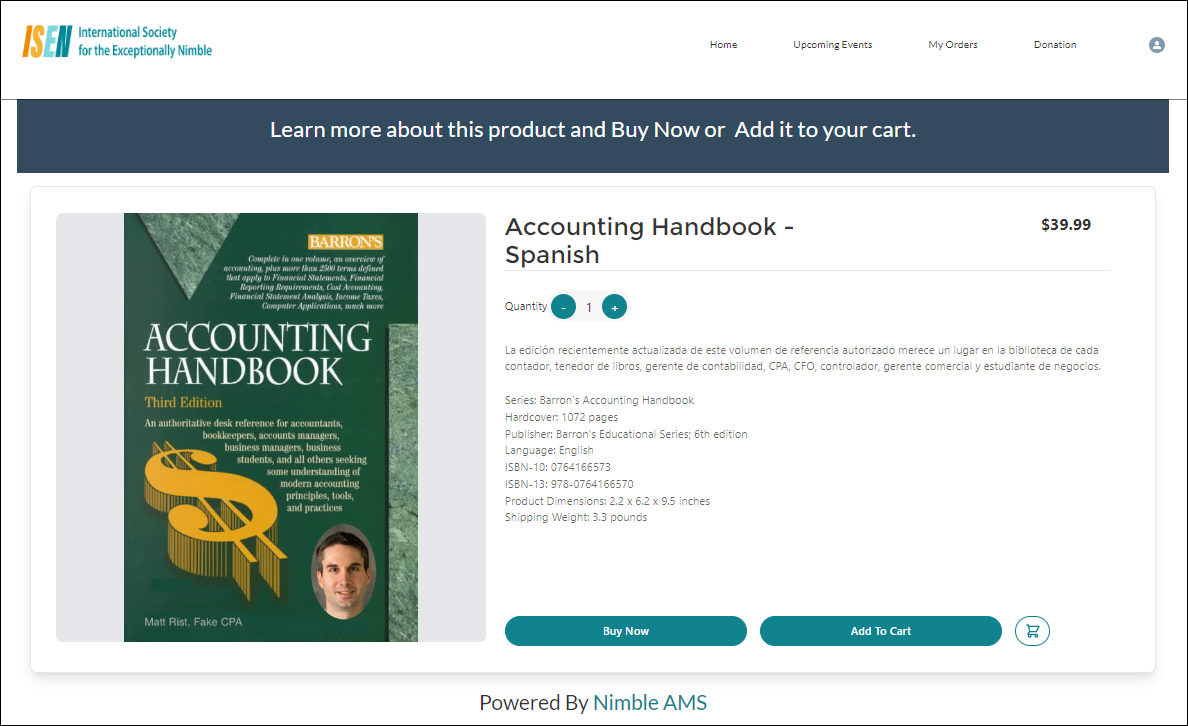
Members can click the Buy Now or Add to Cart button to proceed. The Buy Now button directs users immediately to the checkout page, allowing them to review their order details. Users can complete their purchase using a New Credit Card, or a Stored Payment Method, or opt for the Scheduled Payment option to plan their payments.
How to Schedule Payments on the Checkout Page
In the given section, we will explore how to schedule payments on the checkout page.
-
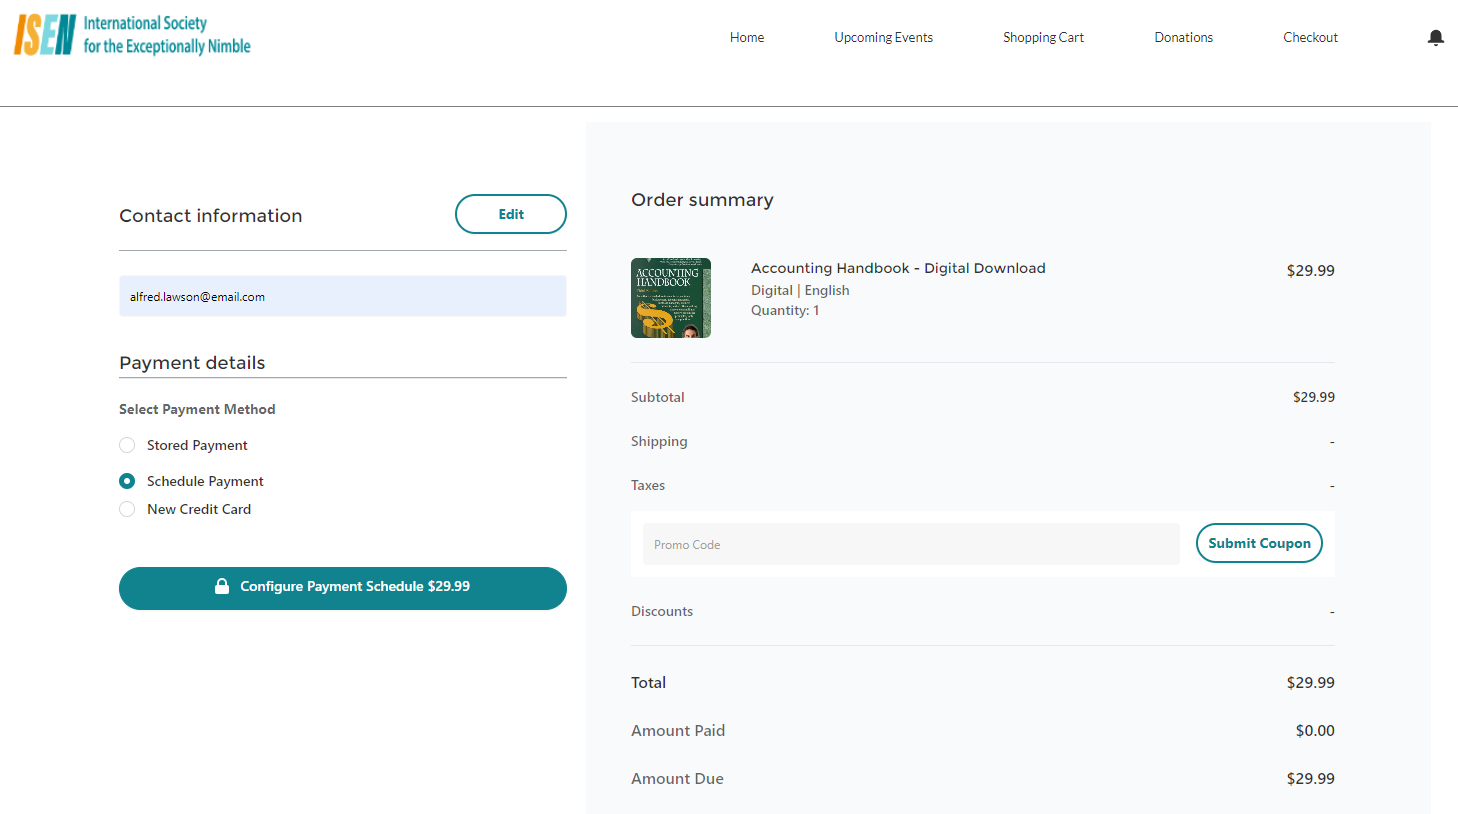
Once the member confirms their purchase and lands on the checkout page, they can proceed by selecting the Scheduled Payment option to set up their payment.
-
Click Configure Payment Schedule.
Expected Result
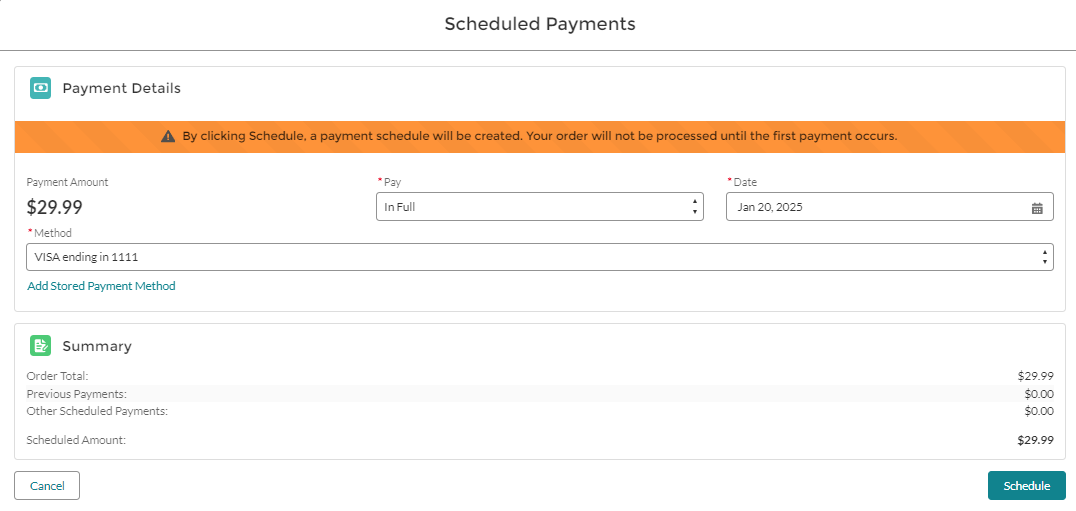
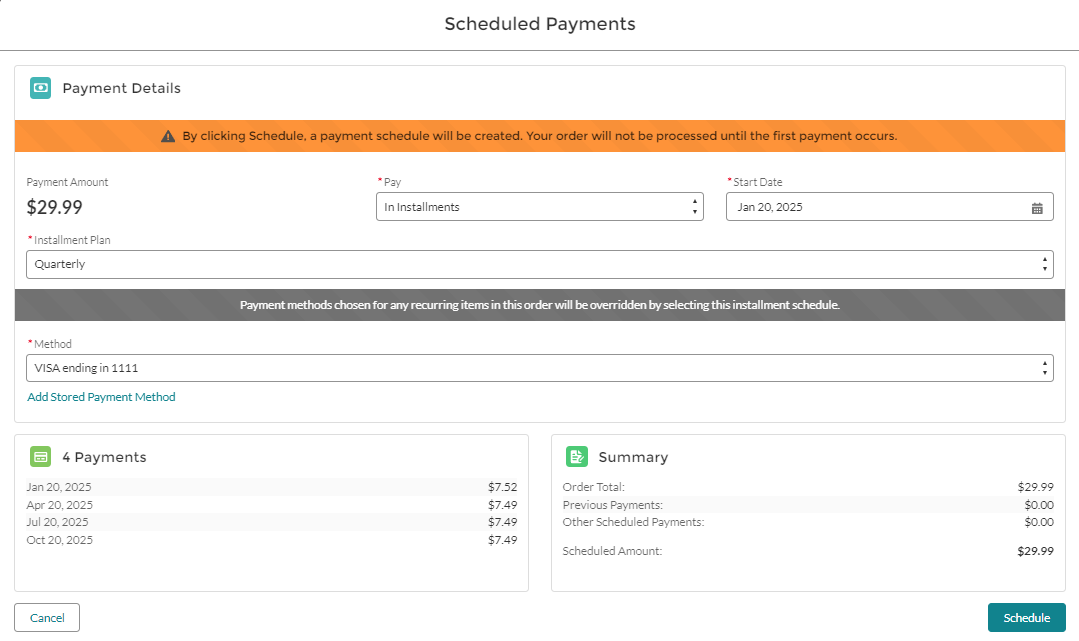
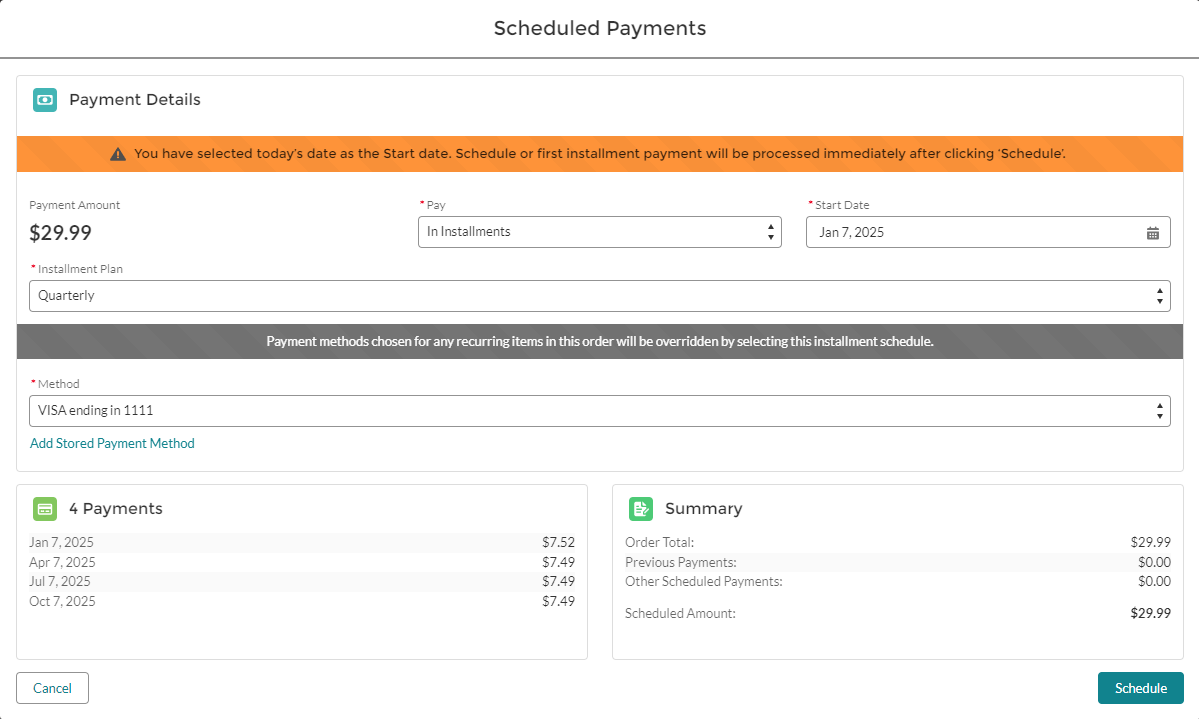
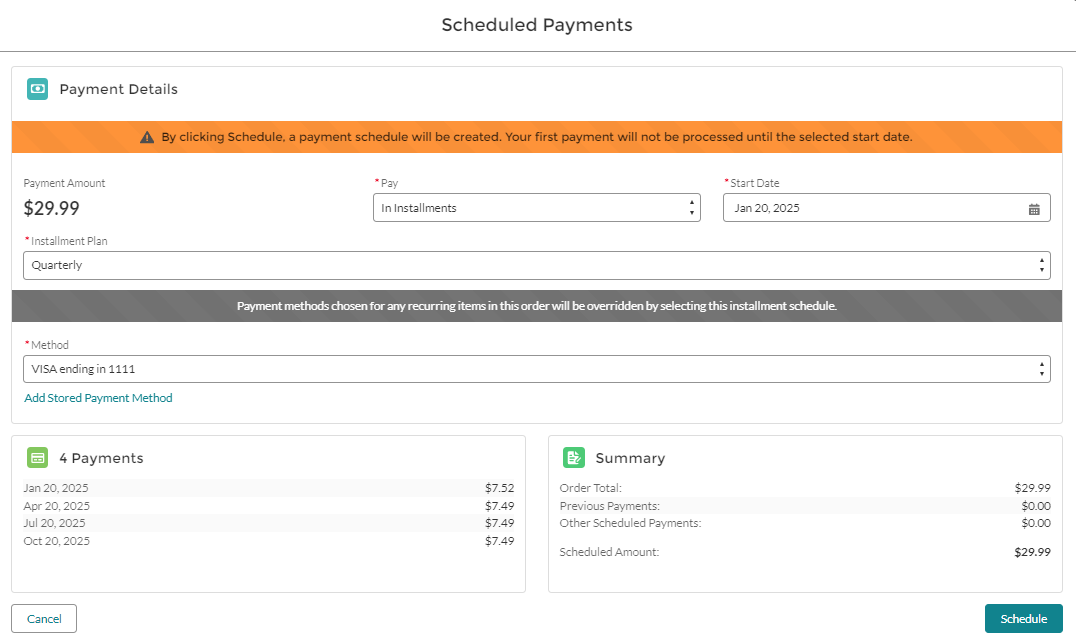
Upon clicking the Configure Payment Schedule button, the Scheduled Payments modal is displayed, allowing association members to perform payment management tasks.
-
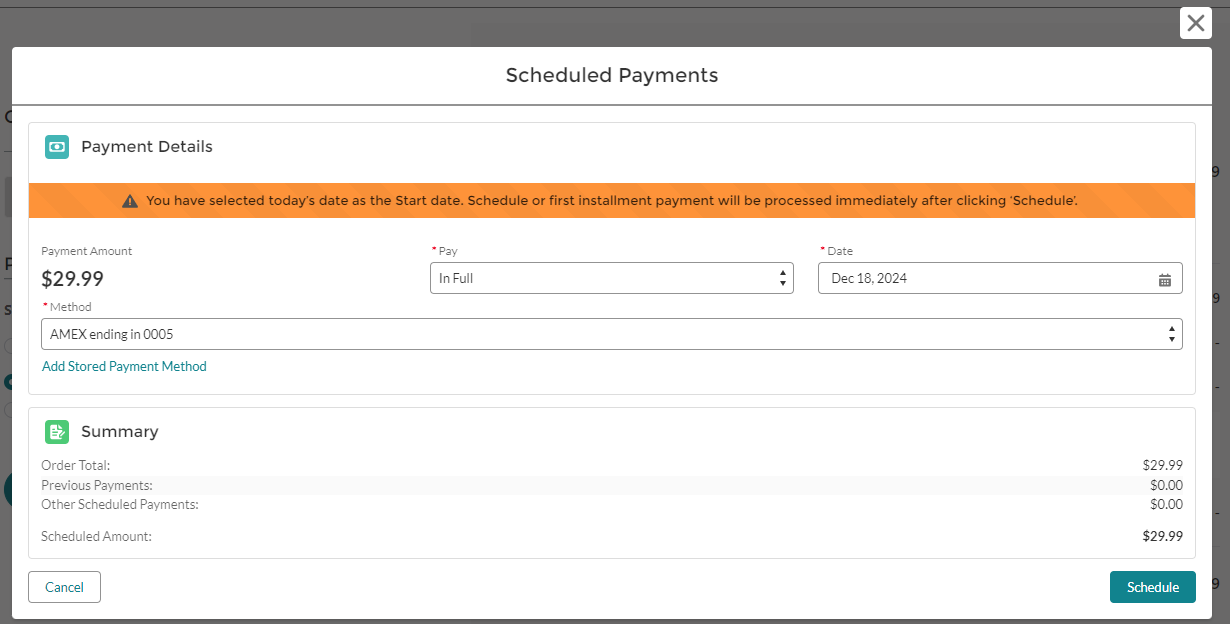
To schedule a payment, fill in the required fields listed below:
-
Pay: Open the dropdown and select either In Full or In Installments. The drop-down menu allows members to select their preferred payment method.-
Selecting In Full option allows the user to make the entire payment in one transaction.
-
Selecting the In Installments option enables the members to split the total amount into multiple payments over a period
-
-
Installment Plan: When you select 'In Installments,' you will be prompted to choose the Installment Plan from the drop-down menu.
We offer bi-weekly, quarterly, and monthly plans; however, each association can customize their installment plan based on their preferences.-
Bi-weekly: Payments are made every two weeks from the selected start date.
-
Monthly: Payments are made once a month on the selected date.
-
Quarterly: Payments are made every three months from the selected start date.
-
-
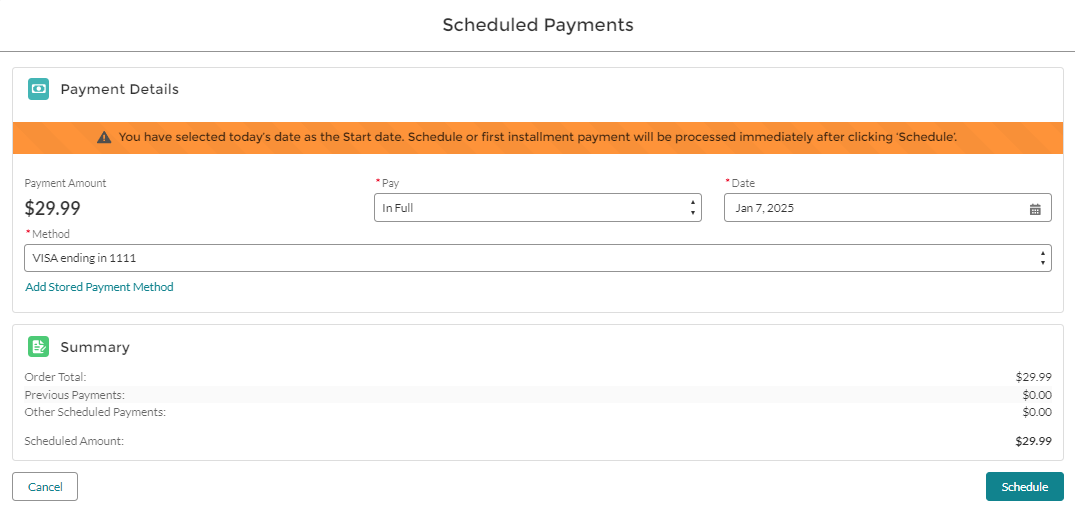
Date: Enter the date on which the payment will be processed.-
For the 'In Full' option, the member selects a Current or Future date to make a one-time payment.
-
For the 'In Installments' option, the user sets a start date, and the system generates subsequent payment dates according to the installment plan selected from that date onwards.
-
-
Past dates cannot be selected; only current or future dates are allowed.
d. Method: Open the drop-down menu and select Stored Payment Method.
e. If you have not added a Payment Method, you will have the Add Stored Payment Method option to enter your Credit Card, Debit Card, or Bank Account details while selecting the payment method.
f. Click Schedule.
The Cancel button lets members exit the current action or close the modal without applying any changes.
After clicking the Schedule button, members are redirected to either the Member Portal Order Summary page or the My Scheduled Payments page, depending on specific conditions such as the start date, and the state of the toggle (Convert Cart To Order When Scheduled).
With the Convert Cart to Order When Scheduled toggle, associations can choose when orders should be created, depending on whether a payment has been received. This toggle also decides if members are redirected to the Order Summary page or the My Scheduled Payments page after clicking the Submit button, based on the selected installment start date. Designed to fit different accounting needs—whether cash-based or accrual-based—the toggle simplifies the scheduling experience for members. Let’s dive into how the toggle’s state and start date shape this process.
Configuring Order Creation with the Convert Cart To Order When Scheduled Toggle
-
If your association follows cash-based accounting where Orders are only created when the payment is made, then Convert Cart To Order When Scheduled is turned OFF. See the scenarios below for how this impacts the scheduling experience.
If you select One-Time pay and start date as Current Date:
To schedule a payment, fill in the required fields listed below:
-
Pay: Open the dropdown and select In Full. -
Date: Enter the current date (today's date) on which the payment will be processed.
Past dates cannot be selected; only current or future dates are allowed.
-
Method: Open the drop-down and select the stored payment method configured for the account. -
If you have not added a Payment Method, you will have the Add Stored Payment Method option to enter your Credit Card, Debit Card, or Bank Account details while selecting the payment method.
The Cancel button enables users to discard the current action or exit the modal without applying any changes.
-
Click Schedule.
Expected Result
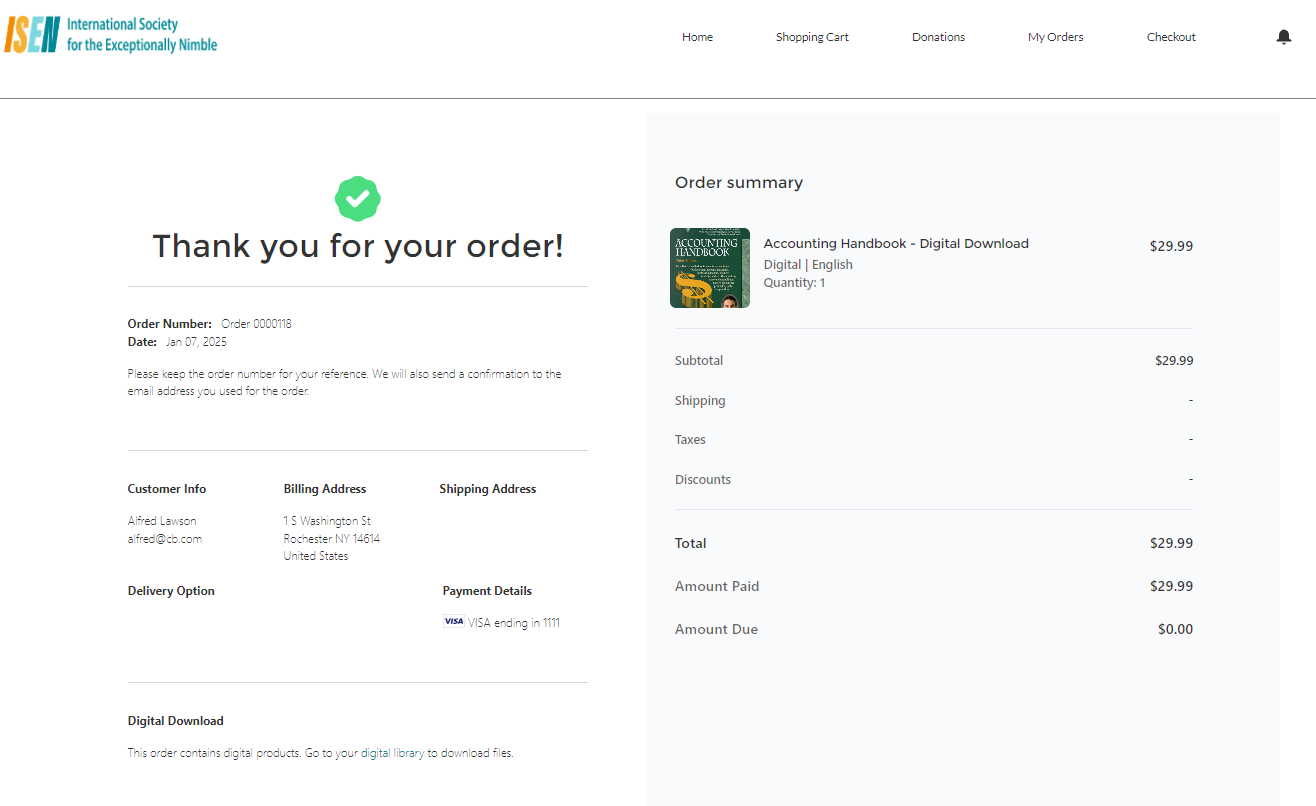
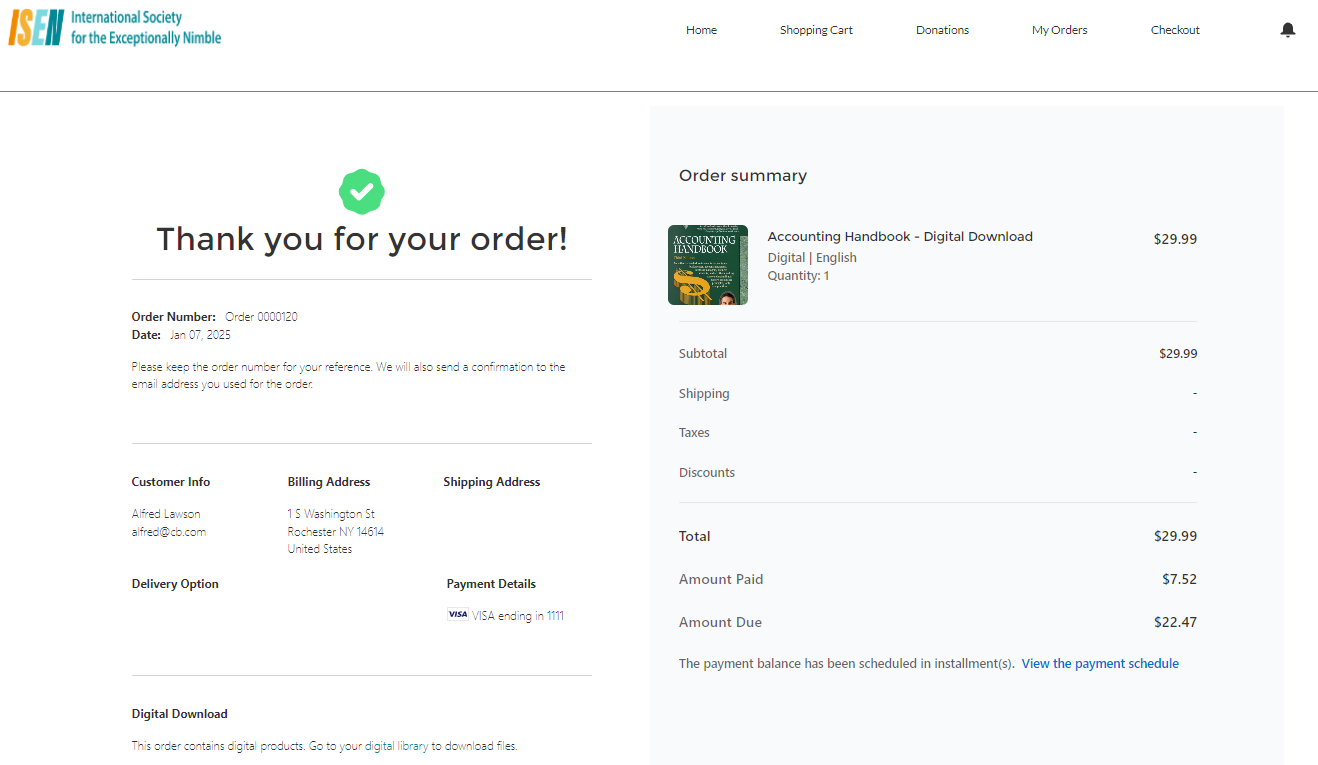
It will redirect you to the Order Confirmation page which provides a summary of the purchased product along with the selected payment method.
If you select One-Time pay and start date is Future Date.
To schedule a payment, fill in the required fields listed below:
-
Pay: Open the dropdown and select In Full. -
Date: Enter the Future date on which the payment will be processed.
Past dates cannot be selected; only current or future dates are allowed.
-
Method: Open the drop-down and select the stored payment method configured for the account. -
If you have not added a Payment Method, you will have the Add Stored Payment Method option to enter your Credit Card, Debit Card, or Bank Account details while selecting the payment method.
The Cancel button enables users to discard the current action or exit the modal without applying any changes.
-
Click Schedule.
Step Result:
-
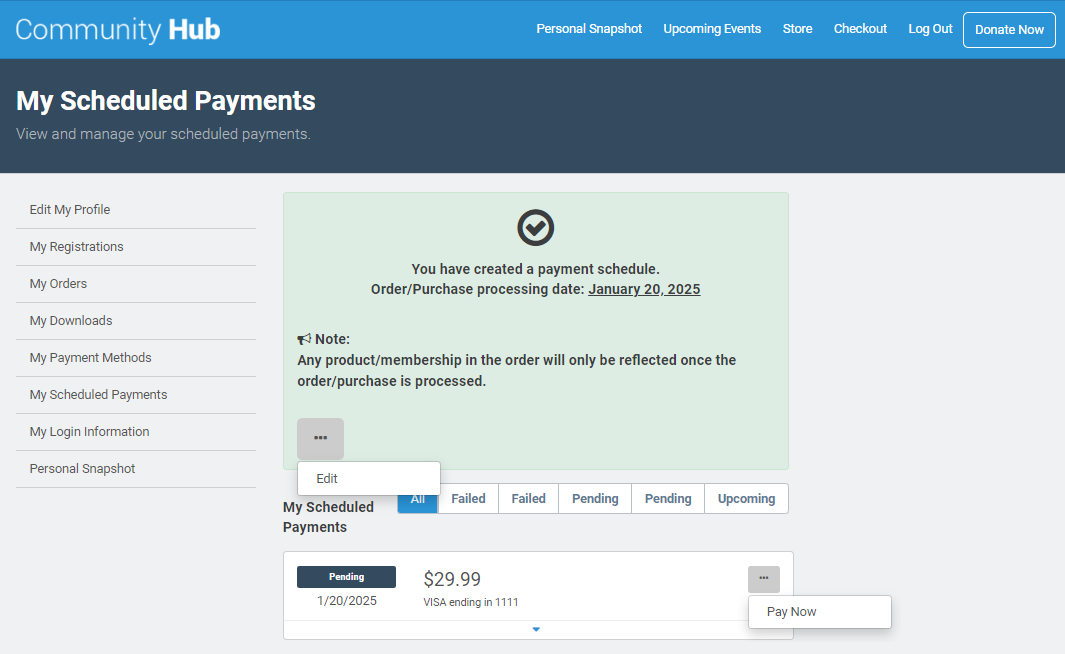
The order will not be processed until the initial payment is completed. The member will not have access to the product/service until the first payment is successfully completed. Consequently, you will be redirected to the My Scheduled Payment Visual Force Page.
-
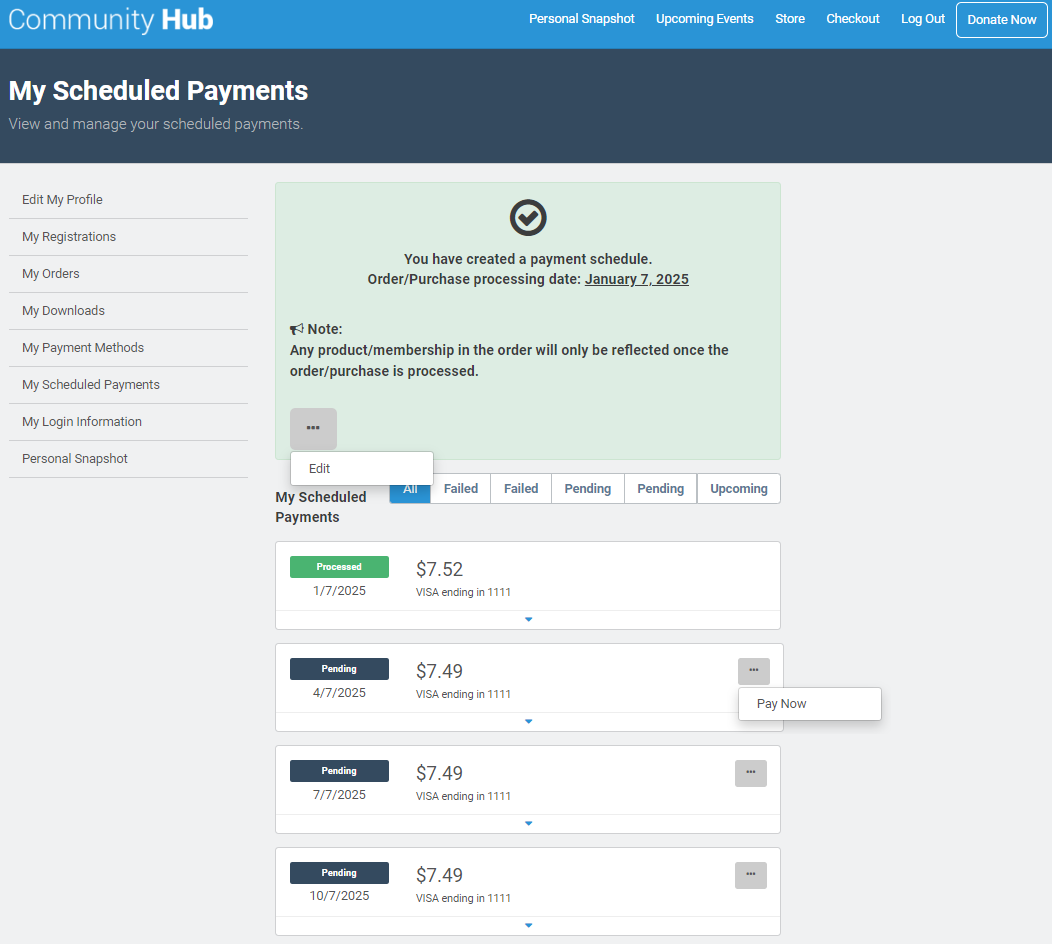
My Scheduled Visual Force CH page displays comprehensive details regarding their one-time scheduled payments. This includes information on the status, date, amount, and payment method. ( Learn More about My Scheduled Payments Page)
-
Members can manage their scheduled payments by clicking on the three dots:
-
Click Pay Now to pay the full amount immediately using the chosen payment method and are taken to the Order Summary Page.
-
Click Edit to update the payment method or the date of the payment. On the Scheduled Payments pop up they also have the option to add a stored payment method by clicking on the link given for the same.
-
If you select Installments pay and start date is Current date.
To schedule a payment, fill in the required fields listed below:
-
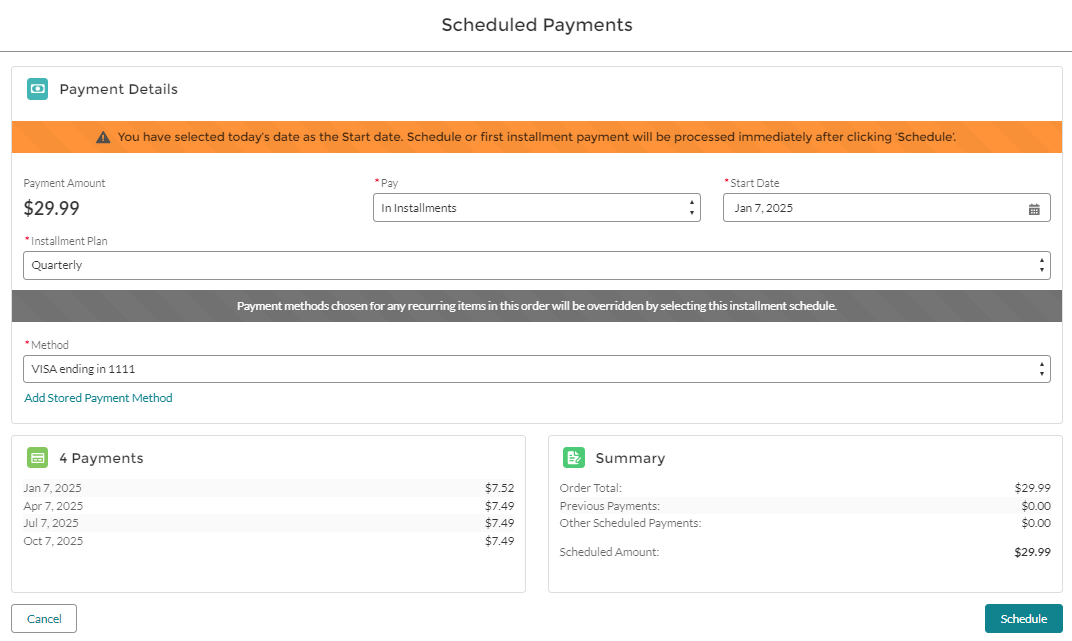
Pay: Open the dropdown and select In Installments. -
Date: Enter the Current date on which the payment will be processed.
Past dates cannot be selected; only current or future dates are allowed.
-
Installment Plan: When you select 'In Installments,' you will be prompted to choose the Installment Plan from the drop-down menu.
We offer bi-weekly, quarterly, and monthly plans; however, each association can customize their installment plan based on their preferences.-
Bi-weekly: Payments are made every two weeks from the selected start date.
-
Monthly: Payments are made once a month on the selected date.
-
Quarterly: Payments are made every three months from the selected start date.
-
-
Method: Open the drop-down and select the stored payment method configured for the account. -
If you have not added a Payment Method, you will have the Add Stored Payment Method option to enter your Credit Card, Debit Card, or Bank Account details while selecting the payment method.
The Cancel button enables users to discard the current action or exit the modal without applying any changes.
-
Click Schedule.
Step Result:
-
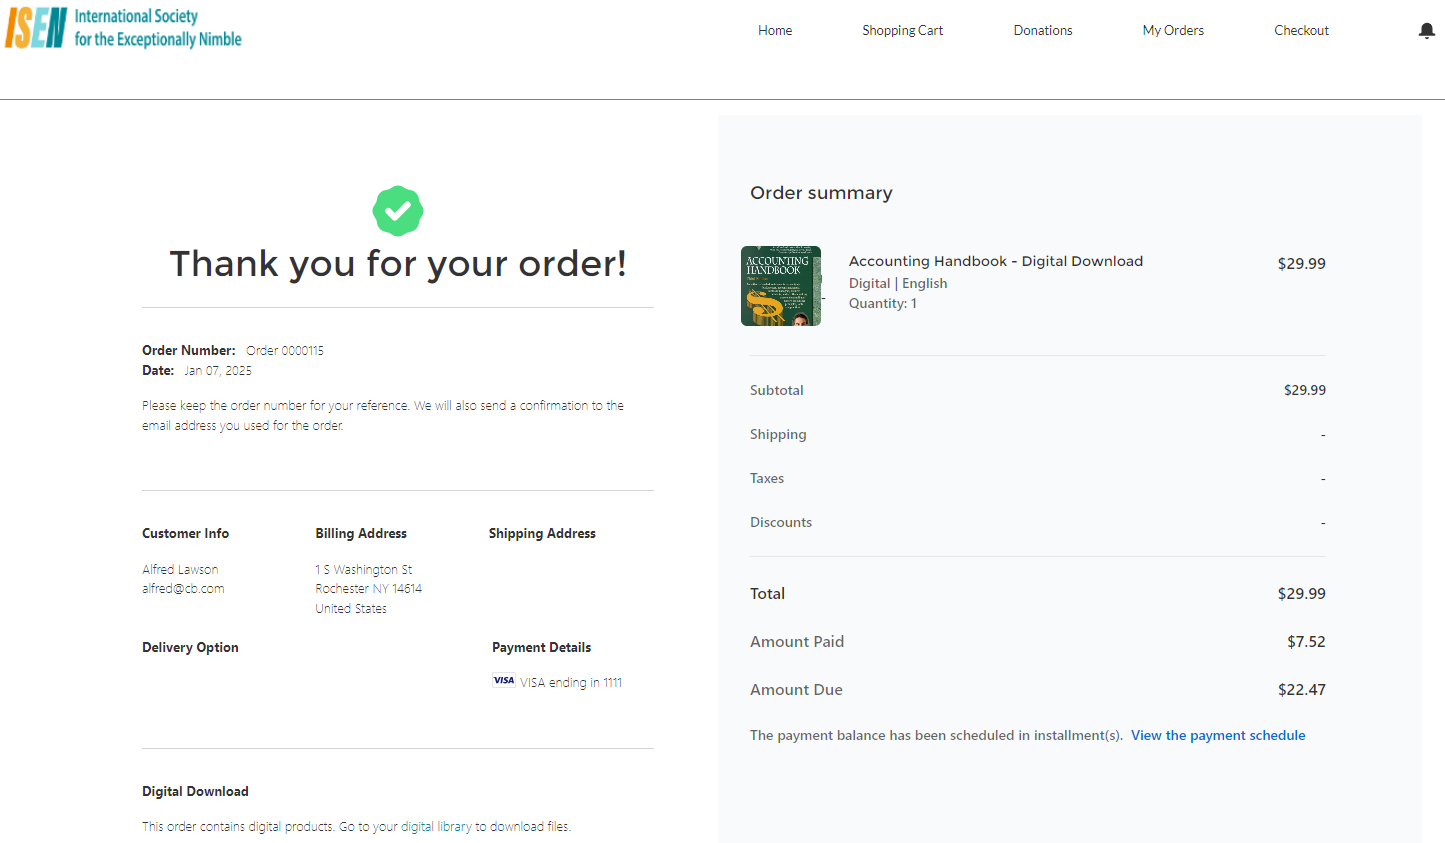
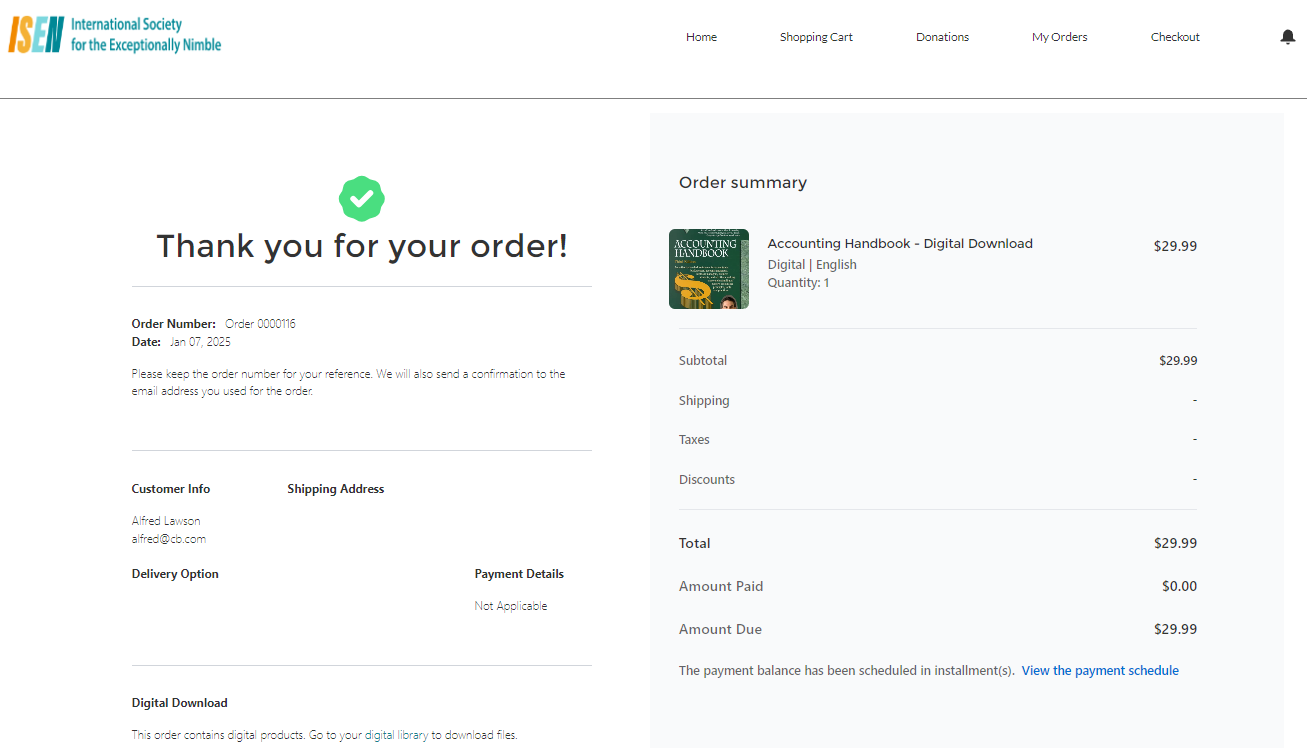
The page will redirect you to the Order Confirmation page, which provides a summary of the purchased product along with the selected payment method.
-
The Order Summary page displays a 'View the payment schedule' hyperlink, which redirects members to the My Scheduled Visual Force CH page to view comprehensive details regarding their Installment payments. This includes information on the status, date, amount, and payment method. ( Learn More about My Scheduled Payments Page)
-
Members can manage their scheduled payments by clicking on the three dots:
-
Click Pay Now to pay the full amount immediately using the chosen payment method and are taken to the Order Summary Pag.
-
Click Edit to update the payment method used to pay the scheduled payments related to the installment plan. On the Scheduled Payments Modal, they also have the option to Add a Stored Payment Method by clicking on the link given for the same.
-
If you select Installments pay and start date is Future Date.
To schedule a payment, fill in the required fields listed below:
-
Pay: Open the dropdown and select In Installments. -
Date: Enter the Future date on which the payment will be processed.
Past dates cannot be selected; only current or future dates are allowed.
-
Installment Plan: When you select 'In Installments,' you will be prompted to choose the Installment Plan from the drop-down menu.
We offer bi-weekly, quarterly, and monthly plans; however, each association can customize their installment plan based on their preferences.-
Bi-weekly: Payments are made every two weeks from the selected start date.
-
Monthly: Payments are made once a month on the selected date.
-
Quarterly: Payments are made every three months from the selected start date.
-
-
Method: Open the drop-down and select the stored payment method configured for the account. -
If you have not added a Payment Method, you will have the Add Stored Payment Method option to enter your Credit Card, Debit Card, or Bank Account details while selecting the payment method.
The Cancel button enables users to discard the current action or exit the modal without applying any changes.
-
Click Schedule.
Expected Result:
-
The order will not be processed until the initial payment is completed. The member will not have access to the product/service until the first payment is successfully completed. Consequently, you will be redirected to the My Scheduled Payment Visual Force Page.
-
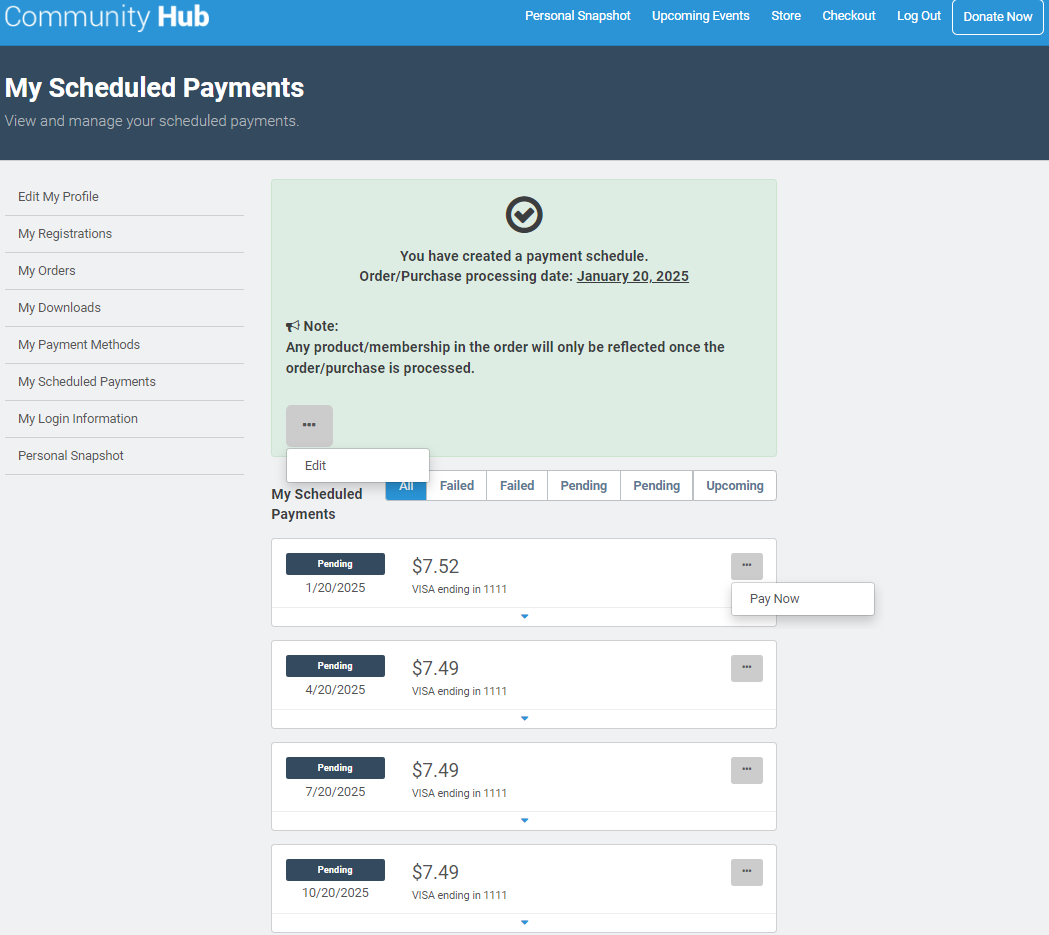
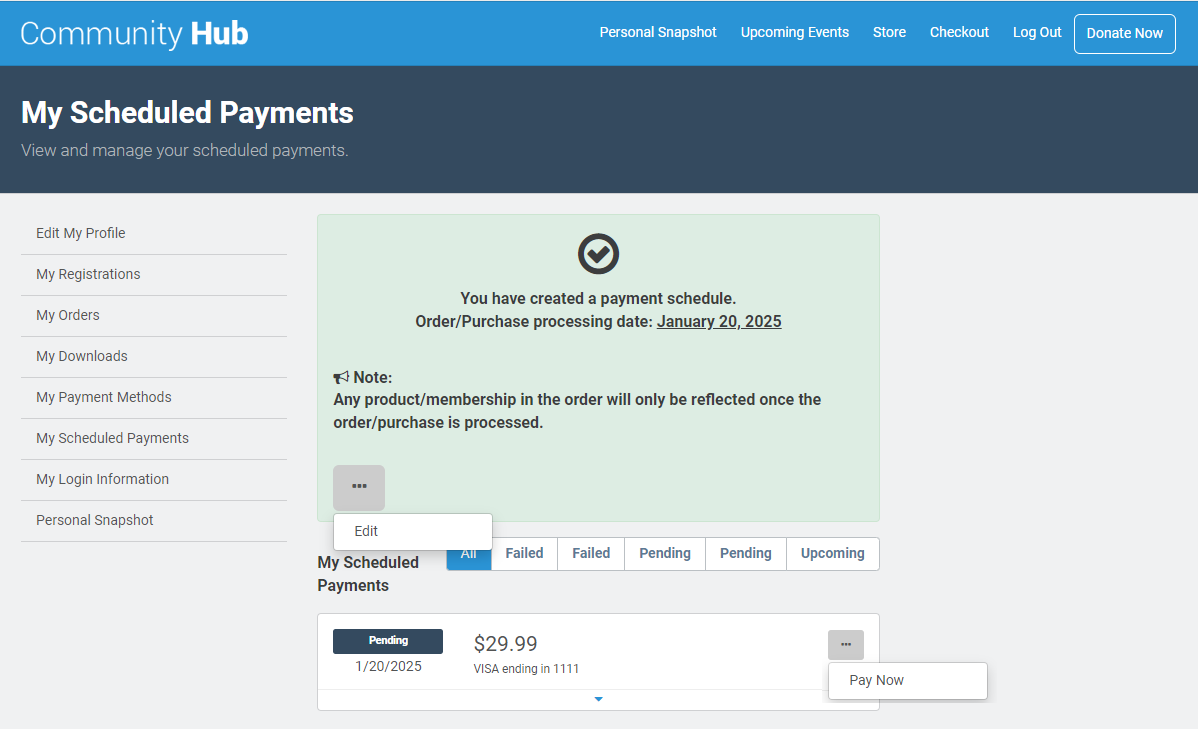
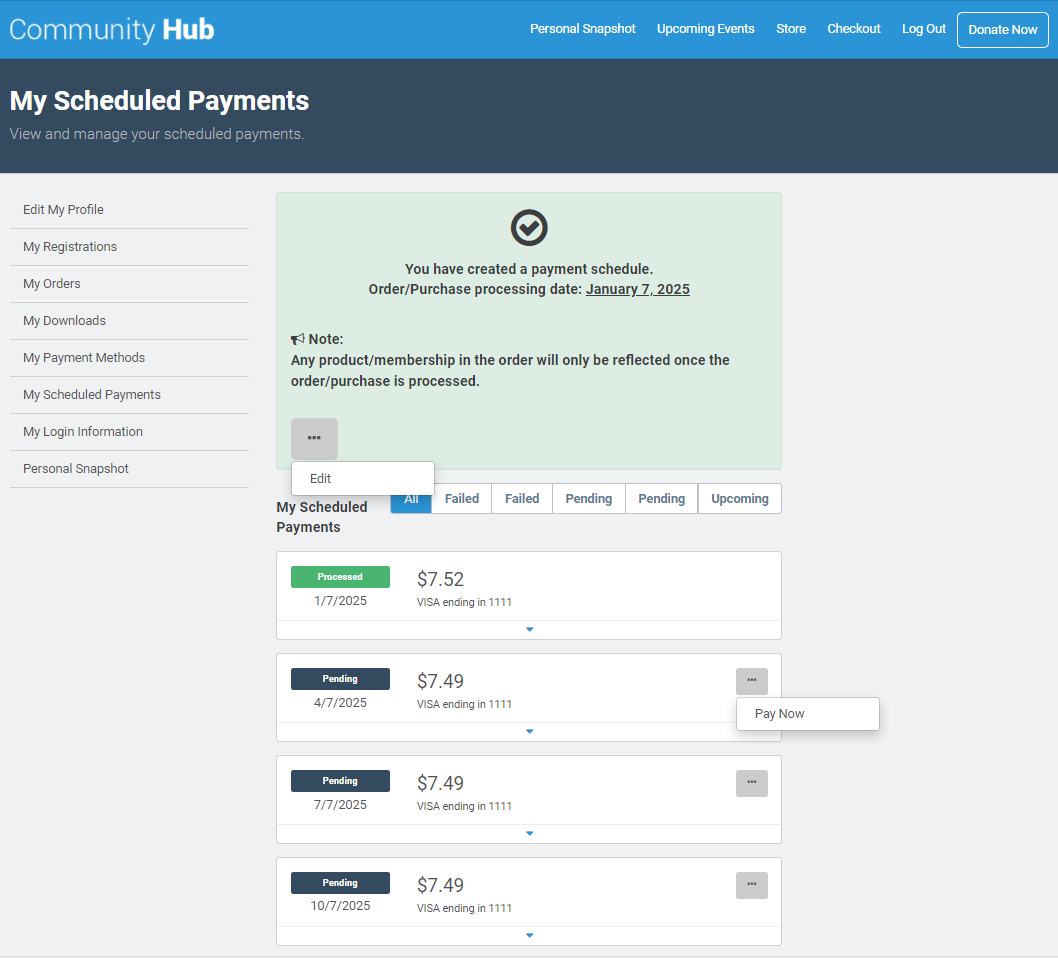
My Scheduled Visual Force CH page displays comprehensive details regarding their Installment scheduled payments. This includes information on the status, date, amount, and payment method. ( Learn More about My Scheduled Payments Page)
-
Members can manage their scheduled payments by clicking on the three dots:
-
Click Pay Now to pay the full amount immediately using the chosen payment method and are taken to the Order Summary Page.
-
Click Edit to update the payment method or the date of the payment. On the Scheduled Payments pop up they also have the option to add a stored payment method by clicking on the link given for the same.
-
-
If your association follows accrual-based accounting where Orders can be created without receiving the payment immediately, then Convert Cart To Order When Scheduled is turned ON. See the scenarios below for how this impacts the scheduling experience.
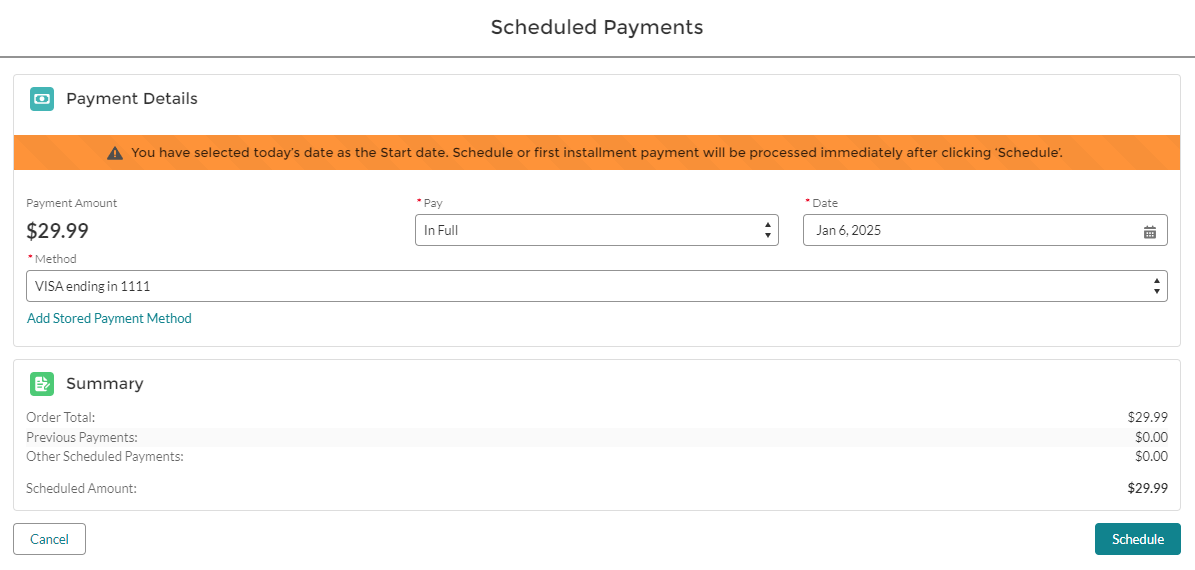
If you select One-Time pay and start date is Current Date:
To schedule a payment, fill in the required fields listed below:
-
Pay: Open the dropdown and select In Full. -
Date: Enter the current date (today's date) on which the payment will be processed.
Past dates cannot be selected; only current or future dates are allowed.
-
Method: Open the drop-down and select the stored payment method configured for the account. -
If you have not added a Payment Method, you will have the Add Stored Payment Method option to enter your Credit Card, Debit Card, or Bank Account details while selecting the payment method.
The Cancel button enables users to discard the current action or exit the modal without applying any changes.
-
Click Schedule.
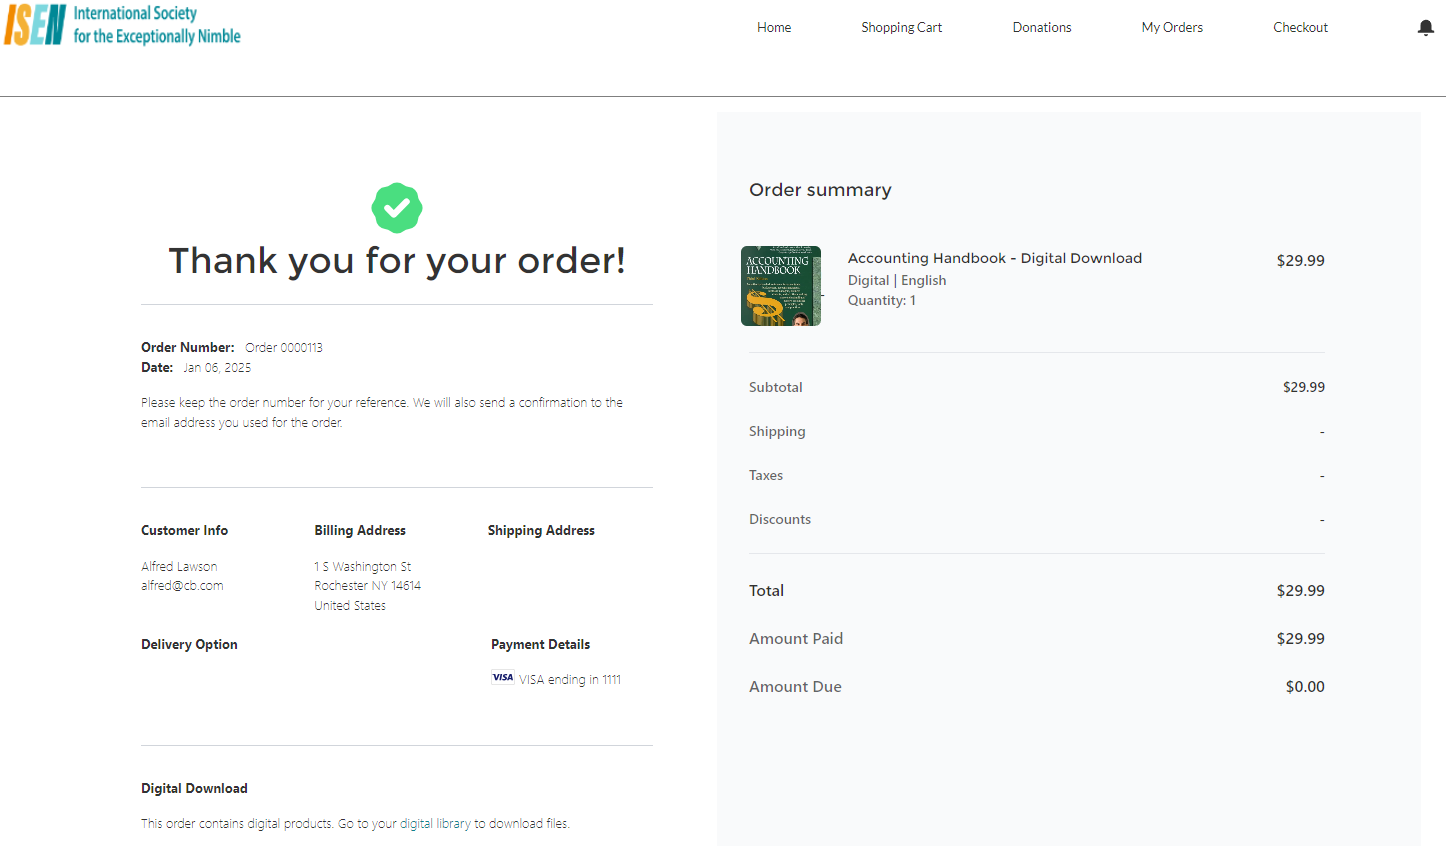
Expected Result:
It will redirect you to the Order Confirmation page which provides a summary of the purchased product along with the selected payment method.
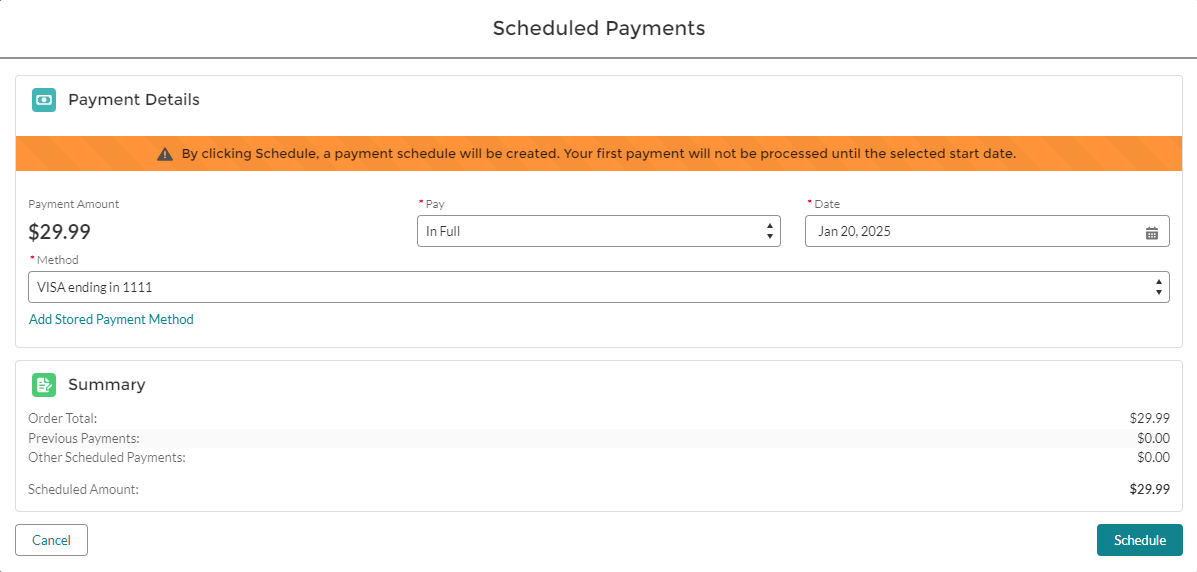
If you select One-Time pay and start date is Future Date.
To schedule a payment, fill in the required fields listed below:
-
Pay: Open the dropdown and select either In Full. -
Date: Enter the Future date on which the payment will be processed.
Past dates cannot be selected; only current or future dates are allowed.
-
Method: Open the drop-down and select the stored payment method configured for the account. -
If you have not added a Payment Method, you will have the Add Stored Payment Method option to enter your Credit Card, Debit Card, or Bank Account details while selecting the payment method.
The Cancel button enables users to discard the current action or exit the modal without applying any changes.
-
Click Schedule.
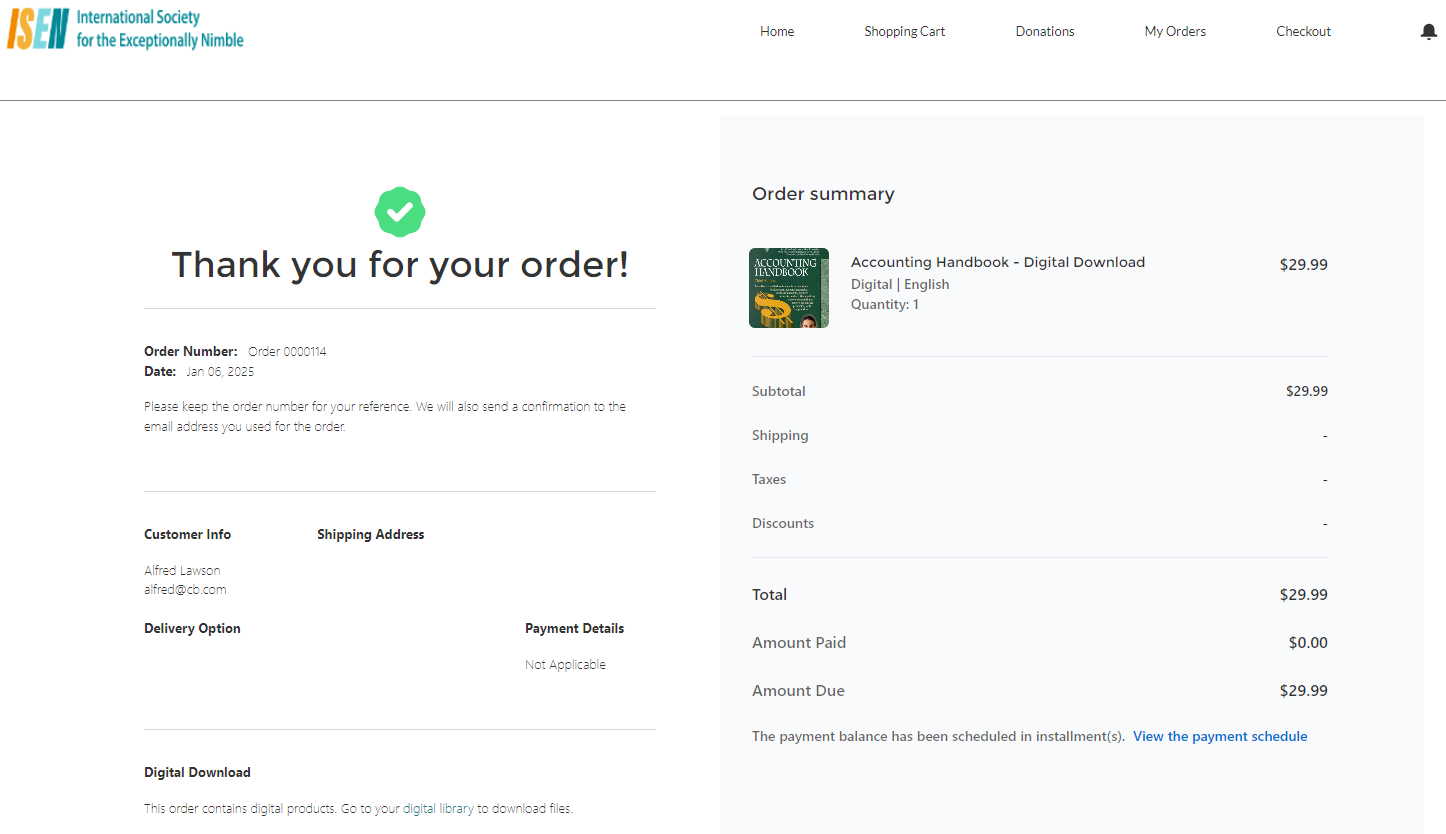
Expected Result:
-
The page will redirect you to the Order Confirmation page, which provides a summary of the purchased product.
-
The Order Summary page displays a 'View the payment schedule' hyperlink, which redirects members to the My Scheduled Visual Force CH page to view comprehensive details regarding their one-time scheduled payments. This includes information on the status, date, amount, and payment method. ( Learn More about My Scheduled Payments Page)
-
Members can manage their scheduled payments by clicking on the three dots:
-
Click Pay Now to pay the full amount immediately using the chosen payment method and are taken to the Order Summary Page.
-
Click Edit to update the payment method or the date of the payment. On the Scheduled Payments pop up they also have the option to add a stored payment method by clicking on the link given for the same.
-
If you select Installments pay and start date is Current Date.
To schedule a payment, fill in the required fields listed below:
-
Pay: Open the dropdown and select In Installments. -
Date: Enter the Current date on which the payment will be processed.
Past dates cannot be selected; only current or future dates are allowed.
-
Installment Plan: When you select 'In Installments,' you will be prompted to choose the Installment Plan from the drop-down menu.
We offer bi-weekly, quarterly, and monthly plans; however, each association can customize their installment plan based on their preferences.-
Bi-weekly: Payments are made every two weeks from the selected start date.
-
Monthly: Payments are made once a month on the selected date.
-
Quarterly: Payments are made every three months from the selected start date.
-
-
Method: Open the drop-down and select the stored payment method configured for the account. -
If you have not added a Payment Method, you will have the Add Stored Payment Method option to enter your Credit Card, Debit Card, or Bank Account details while selecting the payment method.
The Cancel button enables users to discard the current action or exit the modal without applying any changes.
-
Click Schedule.
Expected Result:
-
The page will redirect you to the Order Confirmation page, which provides a summary of the purchased product along with the selected payment method.
-
The Order Summary page displays a 'View the payment schedule' hyperlink, which redirects members to the My Scheduled Visual Force CH page to view comprehensive details regarding their Installment payments. This includes information on the status, date, amount, and payment method. ( Learn More about My Scheduled Payments Page)
-
Members can manage their scheduled payments by clicking on the three dots:
-
Click Pay Now to pay the full amount immediately using the chosen payment method and are taken to the Order Summary Pag.
-
Click Edit to update the payment method used to pay the scheduled payments related to the installment plan. On the Scheduled Payments Modal they also have the option to Add a Stored Payment Method by clicking on the link given for the same.
-
If you select Installments pay and start date is Future Date.
To schedule a payment, fill in the required fields listed below:
-
Pay: Open the dropdown and select In Installments. -
Date: Enter the Future date on which the payment will be processed.
Past dates cannot be selected; only current or future dates are allowed.
-
Installment Plan: When you select 'In Installments,' you will be prompted to choose the Installment Plan from the drop-down menu.
We offer bi-weekly, quarterly, and monthly plans; however, each association can customize their installment plan based on their preferences.-
Bi-weekly: Payments are made every two weeks from the selected start date.
-
Monthly: Payments are made once a month on the selected date.
-
Quarterly: Payments are made every three months from the selected start date.
-
-
Method: Open the drop-down and select the stored payment method configured for the account. -
If you have not added a Payment Method, you will have the Add Stored Payment Method option to enter your Credit Card, Debit Card, or Bank Account details while selecting the payment method.
The Cancel button enables users to discard the current action or exit the modal without applying any changes.
-
Click Schedule.
Expected Result:
-
The page will redirect you to the Order Confirmation page, which provides a summary of the purchased product.
-
The Order Summary page displays a 'View the payment schedule' hyperlink, which redirects members to the My Scheduled Visual Force CH page to view comprehensive details regarding their Installment payments. This includes information on the status, date, amount, and payment method. ( Learn More about My Scheduled Payments Page)

-
Members can click on the three dots for action they can take:
-
Click Pay Now to pay the full amount immediately using the chosen payment method and are taken to the Order Summary Page.
-
Click Edit to update the payment method used to pay the scheduled payments related to the installment plan. On the Scheduled Payments Modal, they also have the option to Add a Stored Payment Method by clicking on the link given for the same.
-
Manage and Pay Your Payment Schedules
Association members can access "My Scheduled Payment" from "My Personal Snapshot" to view their payment schedules and take any necessary actions. They can easily check the details of their scheduled payments, make cancellations or edits if needed, and conveniently pay off their installments through the "My Scheduled Payment" page. ( Refer: My Scheduled Payments Page)
Related links
Convert Cart to Order with Scheduled Payments