Associations using a hybrid community hub can manage scheduled payments in the staff view. Staff users can plan both One-time and Installment payments for a Pro Forma and Processed order directly from the Order record.
Previously, One-Time and Installment Schedule Payment options were available during cart checkout within the Order Processor. With the Hybrid Toggle enabled, this functionality has moved to the Order Detail page. Association staff will now complete the checkout to create a Pro Forma or unpaid Processed Order. Afterward, they’ll be redirected to the Order Detail page, where they can apply a Schedule Payment using the dedicated button.
Create a One-time Scheduled or Installment Payment
Staff users can conveniently schedule a payment for both Pro Forma and Processed orders directly from an Order record.
Schedule a One-time payment
-
In the tab bar, click on the App launcher icon; in Salesforce Classic, click +, Search Nimble AMS, Staff View, Button, and All Tabs.
-
Search for Orders and click on it.
-
Click on the Order ID you wish to schedule.
-
Click Schedule Payment.
-
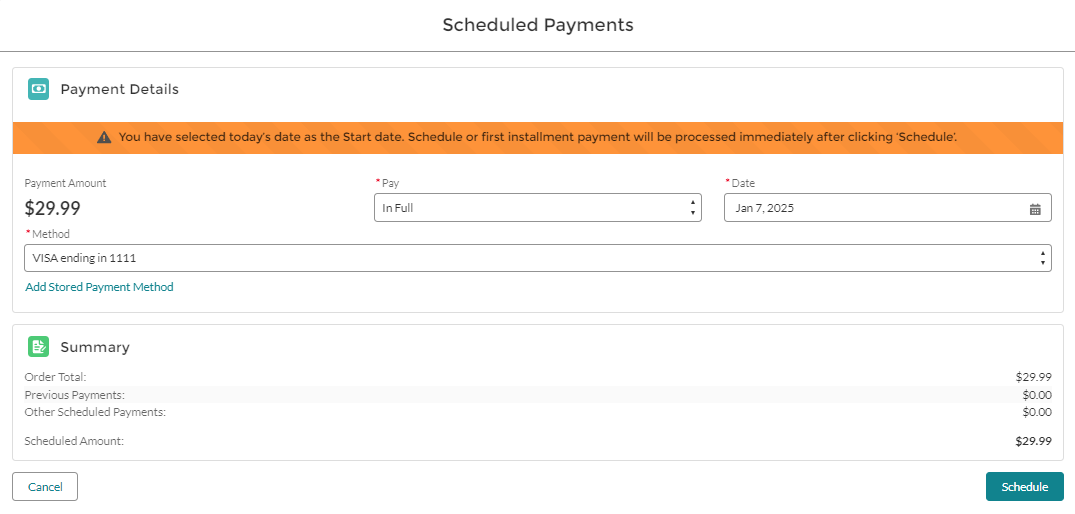
The Scheduled Payments modal allows staff users to perform payment scheduling tasks.
-
To schedule a payment, fill in the required fields listed below:
-
Pay: Click on the dropdown and select In Full.-
Selecting In Full option allows the user to make the entire payment in one transaction.
-
-
Date: Enter the date on which the payment will be processed.
-
Past dates cannot be selected; only current or future dates are allowed.
c. Method: Click on the drop-down and select the stored payment method configured for the account.
d. If you have not added a payment method, you will have the Add Stored Payment Method option to enter your credit card, debit card, or bank account details when selecting the payment method.
The Cancel button allows users to stop the current action or close the modal without saving any changes.
-
Click Schedule.
Expected Result:
-
When a one-time payment is planned for the Current date and the user clicks the Schedule button, the system generates the payment Schedule and corresponding Schedule Line. The Schedule Line displays the
StatusasProcessed, and the Order record shows a balance of$0. During the time order, theStateremains asProcessed. -
When a one-time payment is planned for the Future date and the user clicks the Schedule button, the system generates the payment Schedule and corresponding Schedule Lines. The Schedule Line displays the
StatusasPending, and the Order record shows a balance as the full payment amount until the scheduled date is reached. During the time order, theStateremains asProcessed. -
If the order
StateisPro Forma, and the One-time scheduled date matches the current date, the orderStatewill update fromPro FormatoProcessed. However, if the One-time scheduled date is set for the future, the order state will remain asPro Formauntil the scheduled date is reached.
Schedule an Installment payment
-
In the tab bar, click on the App launcher icon; in Salesforce Classic, click +, Search Nimble AMS, Staff View, Button, and All Tabs.
-
Search for Orders and click on it.
-
Click on the Order ID you wish to schedule.
-
Click Schedule Payment.
-
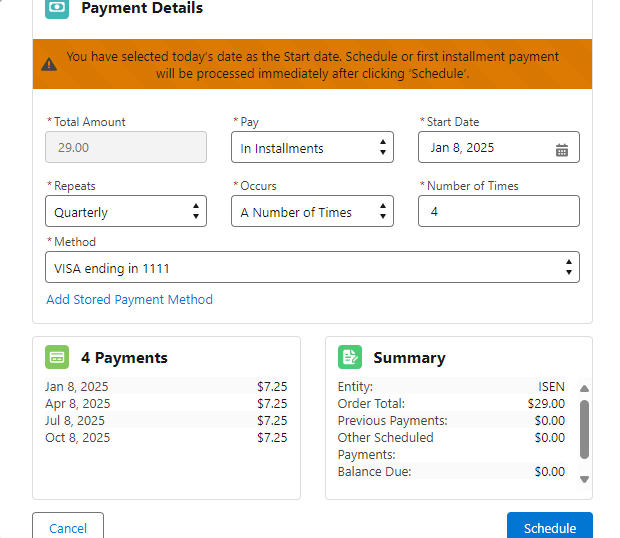
The Scheduled Payments modal allows staff users to perform payment scheduling tasks.
-
To schedule a payment, fill in the required fields listed below:
-
Pay: Click on the dropdown and select In Installment.-
Selecting the In Installments option enables the members to split the total amount into multiple payments over a period
-
-
Repeats:When you select 'In Installments,' you will be prompted to choose the Repeats from the drop-down menu.
We offer bi-weekly, quarterly, and monthly plans; however, each association can customize their installment plan based on their preferences.-
Bi-weekly: Payments are made every two weeks from the selected start date.
-
Monthly: Payments are made once a month on the selected date.
-
Quarterly: Payments are made every three months from the selected start date.
-
-
Date: Enter the date on which the payment will be processed.
-
Past dates cannot be selected; only current or future dates are allowed.
d. Occurs: Click on the drop-down and select Until an End Date or A Number of Times.
i. Until an End Date focuses on ending the payment schedule by a specific date.
ii. A Number of Times focuses on ending the payment schedule after a specific number of payments.
e. Method: Click on the drop-down and select the stored payment method configured for the account.
f. If you have not added a payment method, you will have the Add Stored Payment Method option to enter your credit card, debit card, or bank account details when selecting the payment method.
The Cancel button allows users to stop the current action or close the modal without saving any changes.
-
Click Schedule.
Expected Result:
-
When an Installment payment is planned for the Current date and the user clicks the Schedule button, the system generates the payment Schedule and multiple Schedule Lines based on the Installment plan. The initial Schedule Line indicates a
StatusasProcessed, while the remaining Scheduled Lines are marked asPending. Additionally, the Order record reflects the outstanding balance, which corresponds to the unpaid amount following the initial payment. -
When an Installment payment is planned for the Current date and the user clicks the Schedule button, the system generates the payment Schedule and multiple Schedule Lines based on the Installment plan. All Schedule Lines display the
StatusasPending, and the Order record shows the balance as the full payment amount until the first payment is processed on the scheduled date. -
If the order state is
Pro Forma, and the Installment scheduled date matches the current date, the orderStatewill update fromPro FormatoProcessed. However, if the Installment scheduled date is set for a Future date, the orderStateremains asPro formauntil the first installment is paid, Once the final installment is paid, the orderStateupdates toProcessed.
Managing Payment Schedules in Staff View
Staff users can Cancel payment schedules directly from the staff view when necessary. They can also review the details of schedule lines, make cancellations or edits as required, and conveniently complete payments.
How to Cancel a One-Time or Installment Schedule
Both one-time scheduled payments and installment payments utilize schedules, so the process for canceling them is the same.
To cancel a one-time or installment payment, follow the below steps:
-
In the tab bar, click on the App launcher icon; in Salesforce Classic, click +, Search Nimble AMS, Staff View, Button, and All Tabs.
-
Search for Schedules and click on it.
-
Click on the Schedule you wish to view.
-
The schedule record page opens.
-
Click Cancel.
Expected Result:
-
If the One-time scheduled payment is fully paid and the user clicks the Cancel button, the system will display a message indicating that the scheduled payment is not eligible to be canceled.
-
When an Installment payment schedule is set for a Current date and the user clicks the Cancel button, the system will cancel the pending Schedule Lines. As a result, the Scheduled record will display the
StageasFinished. -
When a One-time payment schedule is set for a Future date and the user clicks the Cancel button, the system will cancel both the Payment Schedule and the associated Schedule Line. Consequently, both the Scheduled and Schedule Lines will display the
Stageascanceled. -
When an Installment payment schedule is set for a Future date and the user clicks the Cancel button, the system will cancel both the Payment Schedule and the associated Schedule Lines. Consequently, both the Scheduled and Schedule Lines will display the
Stageascanceled.
Edit, Cancel, and Pay Now: Options for One-Time or Installment Schedule Lines
Both one-time scheduled payments and installment payments use schedule lines, making the processes for editing, canceling, and processing these payments are same.
To Edit, Cancel, and Pay Now a one-time or installment payment, follow the below steps:
-
In the tab bar, click on the App launcher icon; in Salesforce Classic, click +, Search Nimble AMS, Staff View, Button, and All Tabs.
-
Search for Schedule Lines and click on it.
-
Click on the Schedule Line you wish to view.
-
The schedule Line record page opens.
-
To proceed,
-
Click Cancel,
-
Alternatively, you can choose Edit,
-
To complete your transaction, click Pay Now.
-
Expected Result:
-
When a staff user clicks the Cancel button, the system will cancel the corresponding Schedule Line and update the
Statustocanceled. -
Click Pay Now will immediately process the full amount for the corresponding Schedule Line using your selected payment method.
-
Click Edit to update the date and payment method used to pay the scheduled payments related to the installment plan. On the Scheduled Payments Modal they also have the option to Add a Stored Payment Method by clicking on the link given for the same.