Set Up Bill Me in the Member Portal
Use this guide to configure a Bill Me option for members who prefer to be invoiced instead of paying immediately during checkout. After configuration, eligible accounts can choose Bill Me as a payment method in the Member Portal.
Overview
Bill Me allows accounts to complete online transactions without submitting payment at the time of checkout. Instead, an invoice or balance is created that can be paid at a later time using your standard billing processes. Members will see the Order with a balance on the My Orders page.
You can control which accounts, products, and product types support Bill Me and you can choose whether it is available in the Member Mortal for checkout.
Before You Begin
Before enabling Bill Me, confirm the following:
-
Using this feature will generate AR, while also approving the receipt of items that were purchased; it is recommended that your finance and billing teams have an accounts receivables collection process in place to ensure payments are received for the items invoiced.
-
You have a clear policy for which Accounts are eligible for Bill Me (for example, only active members or specific membership types).
-
You know which products should allow Bill Me (for example, memberships or event registrations).
Step 1: Update Page Layouts
-
Add
Trustedto the Account Page Layouts.-
From Setup, click Customize | Accounts | Person Accounts | Page Layouts.
-
In the "Page Layouts" list, click Edit next to "Person Account Layout".
-
Add
TrustedbelowAccount Money Spent. -
Click Save.
-
Repeat these steps for any custom Person Account Page Layouts.
-
-
Add
Bill Me Enabledto the Product Page Layouts.-
From Setup, click Create | Objects.
-
In the Custom Objects list, click Product.
-
In the "Page Layouts" list, click Edit next to "Product".
-
Add
Bill Me EnabledbelowSelf Service Enabled. -
Click Save.
-
Repeat these steps for any additional product types that you wish to support with Bill Me, such as Membership, Registration, Subscription, etc - including any custom Product Page Layouts.
-
-
Add
Bill Me Enabledto the Product Type Layouts.-
From Setup, click Create | Objects.
-
In the Custom Objects list, click Product Type.
-
In the "Page Layouts" list, click Edit next to "Donation".
-
Add
Bill Me EnabledbelowSelf Service Enabled. -
Click Save.
-
Step 2: Enable Bill Me for Accounts
Configure which individual accounts can select Bill Me in the Member Portal. This may depend on membership status, organization affiliation, or internal policies.
-
Update member records that should be able to select Bill Me and set the Trusted field to True/checked.
Step 3: Enable Bill Me on Entity
Configure which entities orders will support Bill Me in the Member Portal.
-
Update Entity records that should be able to support Bill Me and set the
Bill Me Enabledfield to True/checked.
Step 4: Enable Bill for Products and Product Types
Bill Me should be available only for specific products or product types. Note: You can set specific products to be eligible for Bill Me, or you can set all products of a specific type to be eligible.
-
For each relevant product or product type, decide if Bill Me should be allowed. Consider activating Bill Me only for items that allow for delayed payments, such as event registrations.
-
For specific products: Update each selected Product record to allow Bill Me by setting the
Bill Me Enabledto True/checked. -
For all entity based products of a specific type: Update the selected Entity Order Item record to allow Bill Me by setting the
Bill Me Enabledto True/checked.
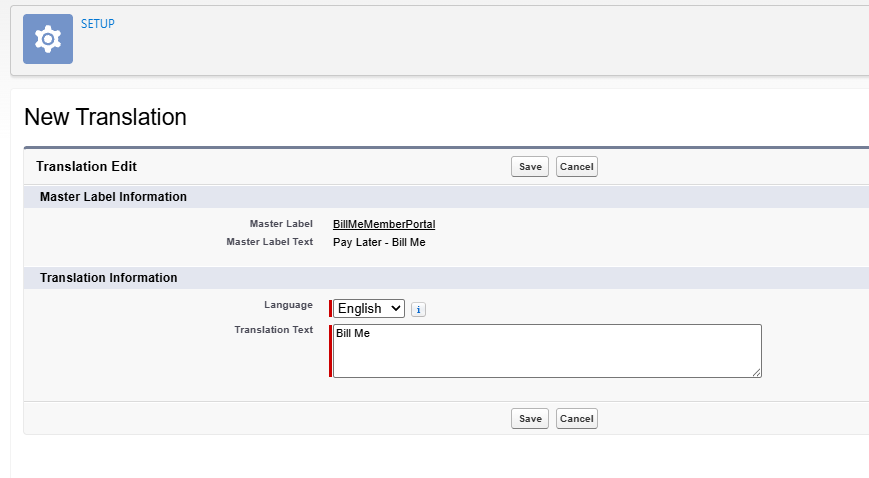
Step 5: Configure the Label that is shown to users when they have the option to select Bill Me
Configuring the display label for Bill Me is done using Custom Labels.
-
Navigate to Setup > Custom Labels
-
Locate and click BillMeMemberPortal
-
Create a new Translation, select English
-
Enter the Label Text in the Translation Text area
-
Save
-
Troubleshooting
Use this section to diagnose and resolve common issues when configuring or using Bill Me in the Member Portal.
|
Issue |
Possible Cause |
|---|---|
|
Bill option does not appear at checkout. |
|