This guide explains how staff should set up events to utilize the new Member Portal Event Registration Experience and how those setup choices affect what members see during registration.
Key Concepts (What’s Changed)
IMPORTANT: Member Portal does not currently support Editing or Cancelling registrations. These activities must be completed by Staff.
Main Event Registration Fees
Previously, to provide a “main registration” fee for an event, staff had to:
-
Create a session group called “Registration”
-
Make it required
-
Set its display order to 1
-
Add session products into that group
This is no longer required.
Important: Please note that the Event Registration updates covered in this article applies only to the Member Portal. The setup and configuration process for events and sessions remains unchanged and follows existing procedures. For detail information on these processes, please refer to the Event Configuration article.
New behavior
-
Any session product linked to an event that is not assigned to a session group is treated as a main registration fee
-
These fees appear as the first selection step in the Member Portal registration wizard, and will support any configuration for Attendee Type
Bundle Product Support
Member Portal Event Registration supports bundle products as selectable options during the registration fee selection. Use a bundle when a single registration choice should add multiple related products to the cart together, such as a conference pass that includes required meals, materials, or bundled session access.
Setup
-
Create or verify the parent bundle product that members should select during registration.
-
Add the required child products to the bundle and confirm their pricing and required quantities.
-
Select “Enabled For Upsell” on the Product Link for the bundled registration product.
When configured this way, the bundles appear in a banner at the top of the page while selecting registration fees. After the member selects the bundle, the registration flow adds the bundle and its included products according to the bundle configuration.
Note: If a user selects and adds a Bundle contains a registration product to their cart from the Store, the Shopping Cart will display a button next to the registration product allowing the user to launch the Event Registration process and will require them to complete the registration before checkout.
Guest
In the new event registration model, guest registrations are driven entirely by how the event’s registration products are configured. Staff create a dedicated event registration product that is
-
Marked “Additional Event Badge” = True”
-
Is not in a Session Group
And explicitly enable Allow Guest Registration on the event.
When enabled, the product can be used to create guest registrations during the registration flow, either as complimentary or paid, based on pricing rules defined on the product.
Co-Worker
If an event is set for “Co-Worker Registration Enabled” = True then a registrant can search for and register a co-worker. Co-workers are defined as sharing an Affiliation with the current user. Users can search for the selected coworker by selecting the “Co-workers” option
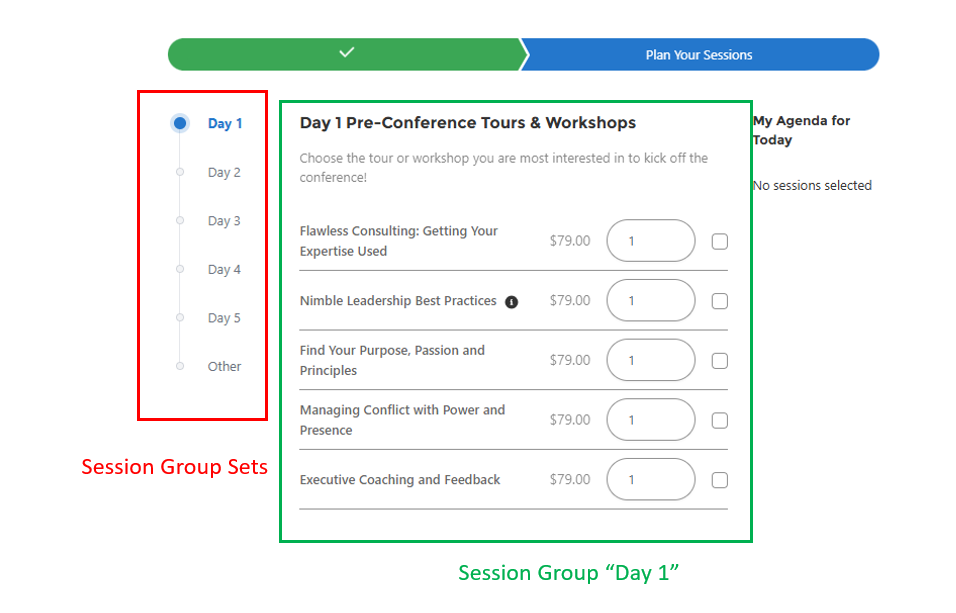
Session Groups vs. Session Group Sets
Understanding the difference between Session Groups and Session Group Sets is key to setting up events correctly in the new registration experience.
These two concepts work together, but they solve different problems.
Session Groups: What choices must a member make out of a group of session choices?
A Session Group represents a set of mutually exclusive choices that occur at the same time.
What a Session Group Does
-
Groups sessions that happen at the same time
-
Ensures members can only choose options from that group that dont conflict
-
Controls scheduling conflicts automatically
Example
Session Group:
Monday – 10:00 AM Session Options
Sessions inside the group:
-
Keynote: The Future of the Industry
-
Breakout A: Leadership Strategies
-
Breakout B: Technical Deep Dive
✅ A member must choose one of these sessions.
Key Rule
If sessions compete with each other for the same time slot, they belong in the same session group.
Session Group Sets: How do members browse and navigate sessions?
A Session Group Set is a container for multiple session groups that controls how sessions are presented and navigated in the registration wizard.
What a Session Group Set Does
-
Organizes session groups into logical sections
-
Creates a structured browsing experience (instead of one long page)
-
Allows members to move through sessions in a predictable way
Common Uses
-
Grouping by day (Monday, Tuesday, Wednesday)
-
Grouping by track or audience (if appropriate)
Example: Multi‑Day Event (How It All Fits Together)
Session Groups (Grouped Session by timeslot)
You create session groups like:
-
Monday 10:00 AM Session Options
-
Monday 1:00 PM Session Options
-
Monday 5:00 PM Session Options
Each group represents one time slot.
Session Group Set (Grouped Session Groups by Day)
You then create a Session Group Set called:
-
Monday / Day 1
And add all Monday session groups into it.
✅ Result for members:
-
They click Monday / Day 1
-
They see all Monday time slots
-
They make selections one time slot at a time
-
Then move on to Tuesday, Wednesday, etc.
Why This Is Different From the Old Model
Previously:
-
Session groups were used for everything
-
Days, times, and navigation were all mixed together
-
Members had to scroll through long, complex pages
Now:
-
Session Groups handle conflicts and time
-
Session Group Sets handle organization and flow
Key Takeaways for Staff
-
Session Groups = scheduling logic
-
“Which sessions compete with each other?”
-
-
Session Group Sets = member navigation
-
“How should members move through the event?”
-
Keeping this distinction clear makes events:
-
Easier to build
-
Easier to maintain
-
Much easier for members to register for
Note: The Member Portal Event Registration still make use of Conflict Codes. To ensure that only 1 session per session group can be selected, all the sessions in that group should share a conflict code.
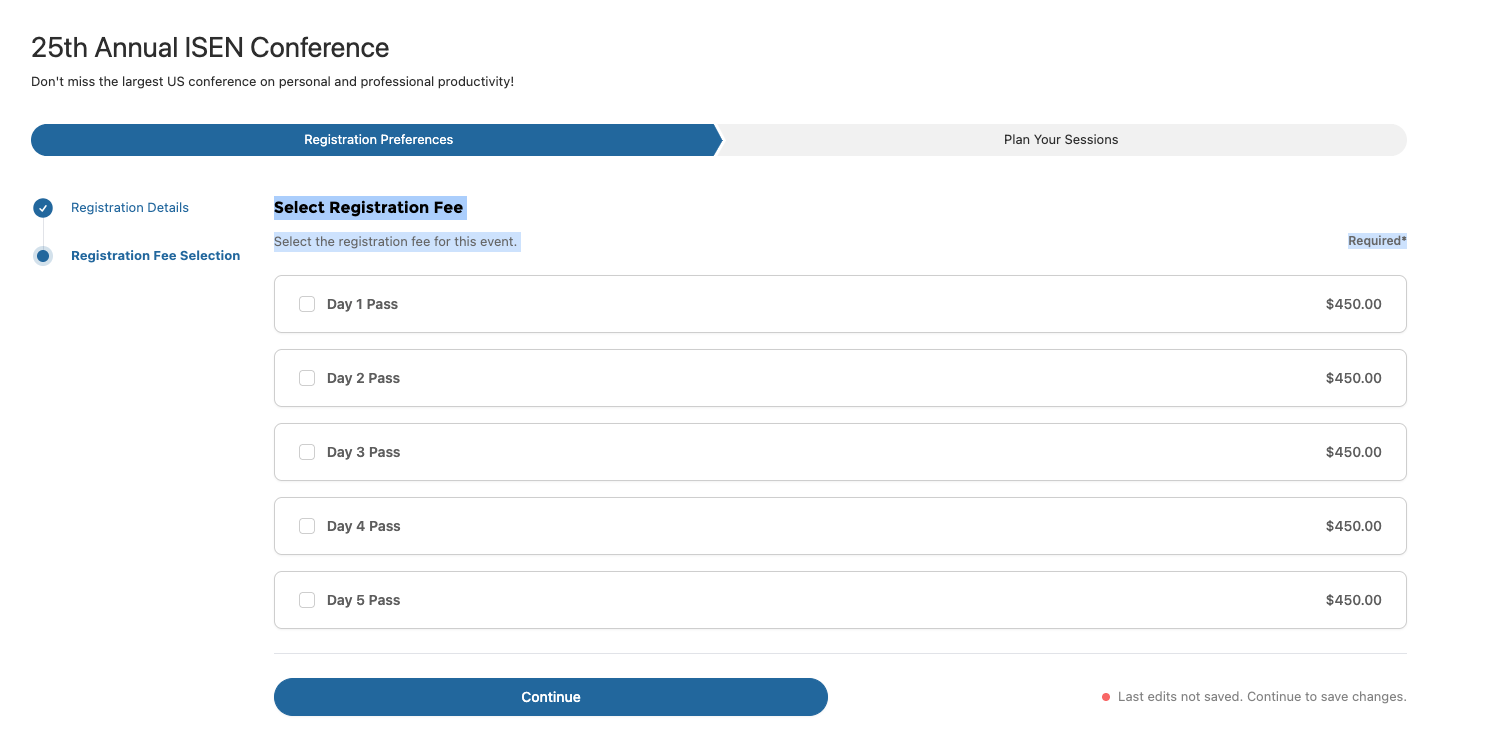
How to Configure Event Registration Fees
When Members Should Choose a Registration Fee
-
Create one or more session products
-
Example: Full Conference, One‑Day Pass
-
Optionally, assign a registration type
-
-
Link them to the event
-
Do not place them in a session group
✅ Members will be required to select one registration fee before proceeding.
When No Registration Fee Selection Is Needed
-
Do not create standalone session products
-
Members are automatically registered for the event
-
Registration begins with session selection
✅ Common for free events or simple registrations.
✅ How to Set Up an Event (Staff Checklist)
Use this checklist when creating or reviewing an event.
Event Basics
- Event record created (date, time, location)
- Registration option confirmed (Express vs. Detail‑Oriented)
Registration Types (If Used)
- Registration types applied to:
-
Sessions
-
Questions
Registration Fees (Main Registration Items)
- Do members need to choose a registration fee?
-
Yes → Create standalone session products not in a session group
-
No → Skip registration fee creation
Sessions
- Session products created
- Sessions grouped by time slot using session groups
Session Group Sets
- Session group sets created (e.g., by day) and Display order set (ie: Monday = 1, Tuesday = 2, Wednesday = 3, …)
- All relevant session groups added to the correct set
- Session order reviewed for clarity
Page Layout Updates
Event Registration for Member Portal makes use of a new object: “Session Group Set”.
-
Ensure that any Staff profiles have read/edit access to the new object
-
Ensure that there is a Tab for the new object
From Setup, open Tabs.
-
In Custom Object Tabs, click New.
-
Select Session Group Set as the object.
-
Choose a tab style, then click Next.
-
Set tab visibility for the appropriate staff profiles.
-
Add the tab to the appropriate app or apps used by staff.
-
Click Save.
-
Confirm staff can access the new Session Group Sets tab and create or edit records as needed.
-
-
Update the page layout for Session Groups to add the new Session Group Sets lookup field
-
From Setup, open Object Manager.
-
Search for and select Session Group.
-
Open Page Layouts, then select the page layout used by staff.
-
In the layout editor, locate the Session Group Set lookup field.
-
Drag the Session Group Set lookup field onto the page layout in the appropriate section.
-
Click Save.
-
Confirm staff can view and update the Session Group Set lookup field on Session Group records.
-
Adding the Event Registration LWC to Member Portal
To make use of the Member Portal Event Registration experience:
Permissions
Any profiles accessing Member Portal must have access to the following Apex classes:
-
EventRegistrationUI
-
EventRegistrationColleagueUI
-
Navigate to Profiles
-
Go to Setup > Profiles
-
Select the profile used for your Member Portal users (ex: Community Hub Login User )
-
Open Apex Class Access
-
Within the profile, scroll down to Apex Class Access
-
Click Edit
-
-
Add Required Classes
-
In the Available Apex Classes list, locate:
-
EventRegistrationUI -
EventRegistrationColleagueUI
-
-
Move both classes to the Enabled Apex Classes column using the Add ( > ) button
-
-
Save Changes
-
1. Create / Verify the Event Registration Page
-
In Experience Builder, create a page (e.g., Event Register).
-
Drag the Event Registration LWC onto the page and configure its look and feel.
-
Configure the component via the LWC config menu:
-
Event Id → {url.id}
-
Shopping Cart Page → enter the API name of the shopping cart age (ie: ShoppingCart)
-
Product Item Details Page → Product_Item_Details?id={id}
-
2. Point Events to Member Portal Registration
For both pages: Upcoming Events (the Event Catalog LWC) and Event Detail (the Event Details LWC):
-
Open the LWC configuration.
-
Update the Register Page URL to the new Member Portal page
(replacing the legacy Community Hub / Visualforce registration page)-
ex: /communityhub/s/event-register
-
Publish the site to apply the changes
3. Update the Product Edit Configuration record for “Registration”
-
Navigate to Setup > Product Edit Configuration > Manage Records > Registration > Edit
-
Set the url from the VF Community Hub value to the new Member Portal value
-
ex: /communityhub/s/event-register?id={0}{1}
-
4. Update/Verify the Dynamic Grid Action record for “View Registration Details”
-
Navigate to Setup > Custom Metadata Types > Dynamic Grid Actions > Manage Records > View Registration Details > Edit
-
Set the:
-
Context: the new Member Portal page url for Registration Details (ex: /communityhub/s/registration-details).
-
Parameters: nu__Event2__c
-
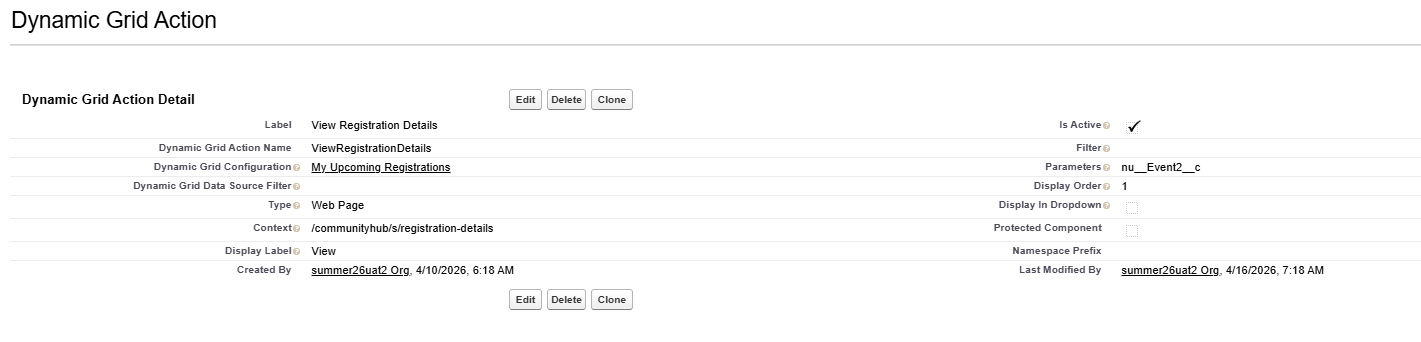
-